

Imagine the delight of biting into a slice of chocolate Swiss roll, where each mouthful brings a soft, spongy texture and a rich cocoa flavor that transports you to another world. This illustrious dessert captures the nostalgia of childhood treats, reminiscent of those beloved Little Debbie snacks, but with a delightful, gluten-free twist. The delicate layers of the cake roll create a beautiful presentation, while the luscious cream cheese filling, sweetened with just the right amount of sugar, brings a creamy indulgence that is utterly irresistible. Whether it’s for a special occasion or a cozy afternoon treat, this chocolate Swiss roll is sure to impress your family and friends with its elegant look and delectable taste. Perfect for sharing on social media, this dessert is not only a treat for the palate but also a feast for the eyes—ideal for Pinterest boards. Get ready to bring a touch of magic into your kitchen with this wonderful recipe that pairs tradition with modern dietary needs.
Why You’ll Love This Recipe
This gluten-free chocolate Swiss roll isn’t just a dessert; it’s a nostalgic journey back to simpler times, combining the comforting flavors of chocolate and cream cheese in a way that can be enjoyed by everyone. It is quick and easy to make, with the smooth process allowing even novice bakers to create a show-stopping treat. Unlike store-bought options, this homemade version lets you control the ingredients and avoid artificial additives, guaranteeing a fresher taste and healthier snack. The versatility of this recipe means you can easily customize the filling or toppings, making it a great canvas for creativity. Plus, it’s the perfect dessert to serve at parties or gatherings, creating lasting memories with each delicious slice.
What Makes This Recipe Special
The magic of this chocolate Swiss roll lies in its unique combination of textures and flavors. The sponge cake is light and airy while being moist, thanks to the careful balance of ingredients. The cocoa powder lends a deep, chocolatey essence, while the optional espresso powder intensifies the flavor without being overpowering. The luscious cream cheese filling adds a creamy, tangy contrast that perfectly complements the sweetness of the roll, making every bite a delightful experience. Additionally, it is gluten-free, catering to dietary restrictions while maintaining an indulgent flavor that everyone will love. This recipe beautifully showcases that gluten-free desserts can be just as delicious as their traditional counterparts.
Ingredients
gluten free flour: Provides the base of the cake, ensuring a light texture without gluten.
cocoa powder: Adds rich chocolate flavor and depth to the sponge cake.
baking powder: Helps the cake rise and achieve a fluffy texture.
baking soda: Works alongside the baking powder for leavening, contributing to the cake’s lightness.
salt: Balances sweetness and enhances the overall flavors of the chocolate.
eggs: Bring structure and moisture, helping bind the ingredients together.
melted butter: Adds richness and flavor to the sponge cake, making it tender.
coconut sugar or regular granulated sugar: Sweetens the batter while providing a hint of caramel flavor in the case of coconut sugar.
espresso powder (optional): Enhances the chocolate flavor without imparting coffee taste.
cream cheese: Forms a creamy, tangy filling that complements the cake wonderfully.
powdered sugar: Sweetens the cream cheese filling and gives it a smooth texture.
vanilla extract: Infuses the filling with aromatic flavor for enhanced depth.
butter (room temp): Offers a rich taste to the cream cheese filling, ensuring it’s spreadable and creamy.
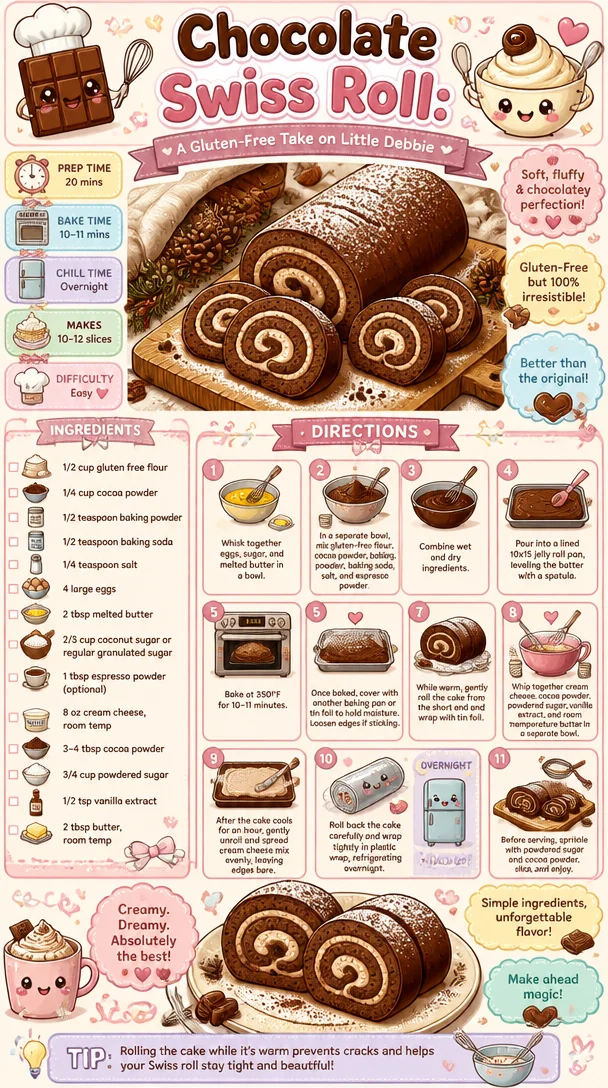
How to Make Chocolate Swiss Roll: A Gluten-Free Take on Little Debbie
STEP 1. Whisk together the wet ingredients. In a bowl, combine eggs, sugar, and melted butter until blended.
STEP 2. Mix the dry ingredients. In a separate bowl, whisk together gluten-free flour, cocoa powder, baking powder, baking soda, salt, and espresso powder.
STEP 3. Combine wet and dry ingredients. Gradually mix the dry ingredient mixture into the wet ingredients until just combined.
STEP 4. Prepare the baking pan. Pour the batter into a lined jelly roll pan, using a spatula to level it evenly.
STEP 5. Bake the cake. Place in a preheated oven at 350°F and bake for 10-11 minutes, until the cake springs back when touched.
STEP 6. Cover and retain moisture. Once baked, cover the cake with another baking pan or tin foil to keep it moist while cooling. Loosen the edges if it sticks.
STEP 7. Roll the cake. While the cake is still warm, gently roll it from the short end, wrapping it in tin foil to maintain its shape.
STEP 8. Prepare the cream cheese filling. In a separate bowl, whip together cream cheese, cocoa powder, powdered sugar, vanilla extract, and room temperature butter until smooth and creamy.
STEP 9. Unroll the cake. After the cake cools for about an hour, gently unroll it and spread the cream cheese mixture evenly, leaving the edges bare.
STEP 10. Re-roll the cake. Carefully roll the cake back up and wrap it tightly in plastic wrap. Refrigerate overnight to set.
STEP 11. Serve the cake. Before slicing, sprinkle with powdered sugar and additional cocoa powder for decoration, then cut and enjoy!

Pro Tips
To ensure your chocolate Swiss roll turns out perfectly, here are some invaluable tips. Start by using room-temperature ingredients, which integrate more easily and produce a smoother batter. When baking, watch closely after the 10-minute mark—every oven varies, so the cake should be just set and spring back lightly when touched. Remember to roll the cake while it’s still warm, as it helps retain its shape without cracking. For an added indulgence, consider incorporating flavored extracts like almond alongside the vanilla to enhance the cream cheese filling. If you find the roll difficult to unroll, using a clean kitchen towel dusted with powdered sugar to assist can make the process seamless. Lastly, letting the rolled cake chill overnight ensures the flavors meld beautifully and the dessert slices cleanly for an impressive presentation.
Common Mistakes to Avoid
To achieve the best results with your chocolate Swiss roll, be cautious of these common mistakes. Using cold ingredients can lead to uneven mixing, so allow your eggs and cream cheese to reach room temperature before use. Another mistake is overmixing the batter, which can create a dense cake; mix just until combined to maintain a lightness. When pouring the batter into the pan, ensure it is lined with parchment paper for easy removal; this step is essential to avoid tearing the rolled cake. Do not skip refrigerating the roll overnight—this step helps solidify the filling and makes slicing easier. Lastly, resist the urge to rush the baking process; baking too long can cause the cake to dry out, compromising its flavor and texture.
Variations
• Add a tablespoon of orange zest for a citrus twist.
• Use almond flour for a nutty flavor.
• Replace the cream cheese filling with whipped cream for a lighter option.
• Incorporate chocolate chips into the batter for extra decadence.
• Drizzle melted dark chocolate over the roll for an elegant finish.
Serving Ideas
Pair your chocolate Swiss roll with a splash of fresh berries to add a bright, tart contrast to the rich flavors. Scoop a dollop of freshly whipped cream alongside each slice for an added layer of indulgence. For a casual gathering, serve with coffee or tea, allowing guests to enjoy the aromas and flavors that complement the dessert beautifully. Consider using it as a centerpiece on a dessert table, surrounded by a selection of other sweet treats for a stunning presentation that invites indulgence.
Meal Prep & Storage
This chocolate Swiss roll is perfect for meal prepping, as it can be made a day in advance, allowing the flavors to develop beautifully. To store, wrap it tightly in plastic wrap to maintain freshness, placing it in the refrigerator where it can last for several days. If you need a longer shelf life, consider freezing slices individually; this way, you can enjoy a taste of indulgence whenever a craving strikes. To thaw, simply place the roll in the refrigerator for a few hours or overnight before serving.
FAQs
Can I make this recipe dairy-free?
Yes, by substituting the cream cheese with a non-dairy alternative and using vegan butter, you can create a delightful dairy-free version.
How can I ensure my roll doesn’t crack?
Rolling the cake while it’s warm helps, along with carefully unrolling it for the filling application, as the warmth keeps it flexible.
Can I make this ahead of time?
Absolutely! Preparing the Swiss roll a day ahead allows for better flavor melding, and it can be stored in the fridge until ready to serve.
What can I use instead of coconut sugar?
Regular granulated sugar is a great alternative that will not affect the flavor significantly.
How do I know when the cake is done baking?
The cake should spring back lightly when touched and have a moist, but set surface, typically taking about 10-11 minutes in the oven.
Conclusion
This gluten-free chocolate Swiss roll is not just a delicious dessert; it’s a heartfelt creation meant to spread joy and bring people together. Whether enjoyed after a family dinner or shared at a gathering, its rich flavors and elegant presentation will surely impress. With each slice, you’ll savor the perfect combination of fluffy cake and creamy filling, making this treat a memorable addition to any occasion.

Chocolate Swiss Roll
Ingredients
Method
- Step 1: Whisk together the wet ingredients. In a bowl, combine eggs, sugar, and melted butter until blended.
- Step 2: Mix the dry ingredients. In a separate bowl, whisk together gluten-free flour, cocoa powder, baking powder, baking soda, salt, and espresso powder.
- Step 3: Combine wet and dry ingredients. Gradually mix the dry ingredient mixture into the wet ingredients until just combined.
- Step 4: Prepare the baking pan. Pour the batter into a lined jelly roll pan, using a spatula to level it evenly.
- Step 5: Bake the cake. Place in a preheated oven at 350°F and bake for 10-11 minutes, until the cake springs back when touched.
- Step 6: Cover and retain moisture. Once baked, cover the cake with another baking pan or tin foil to keep it moist while cooling. Loosen the edges if it sticks.
- Step 7: Roll the cake. While the cake is still warm, gently roll it from the short end, wrapping it in tin foil to maintain its shape.
- Step 8: Prepare the cream cheese filling. In a separate bowl, whip together cream cheese, cocoa powder, powdered sugar, vanilla extract, and room temperature butter until smooth and creamy.
- Step 9: Unroll the cake. After the cake cools for about an hour, gently unroll it and spread the cream cheese mixture evenly, leaving the edges bare.
- Step 10: Re-roll the cake. Carefully roll the cake back up and wrap it tightly in plastic wrap. Refrigerate overnight to set.
- Step 11: Before slicing, sprinkle with powdered sugar and additional cocoa powder for decoration, then cut and enjoy!