
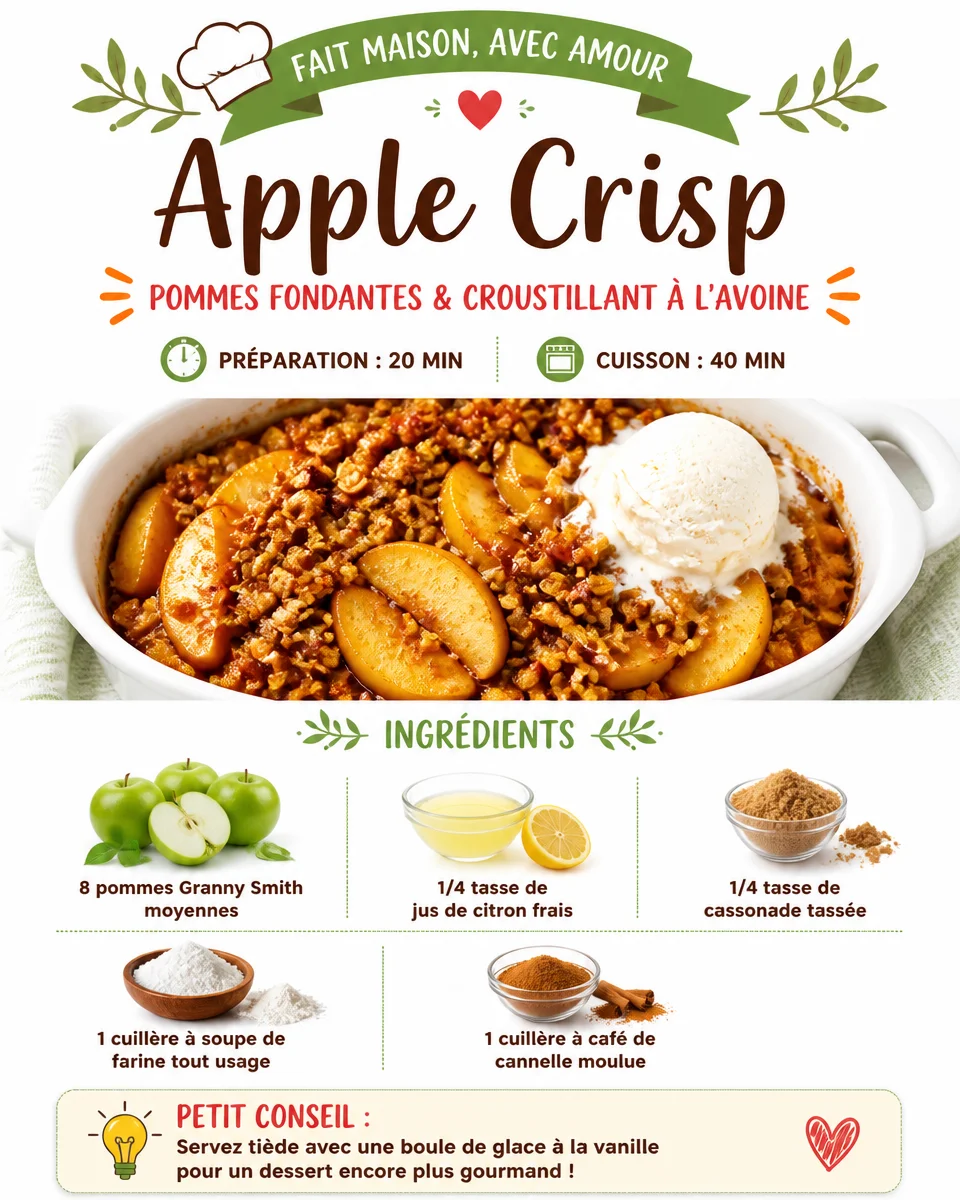
When autumn arrives, the air turns crisp, and the leaves showcase vibrant hues, there’s nothing more comforting than a warm dessert straight from the oven. This dish embodies the essence of fall, offering a tantalizing mix of sweet and tart Granny Smith apples topped with a deliciously buttery and crunchy layer. Each bite is a delightful dance of flavors and textures, where the juicy apples provide a tender base, while the crisp topping contrasts beautifully, creating a harmonious experience for your taste buds. And let’s not forget the rich aroma that fills your kitchen, inviting everyone to gather around the table. Pair it with a scoop of vanilla ice cream or a drizzle of caramel sauce, and you have a dessert that beckons to be savored. Perfect for cozy gatherings or a simple family treat, this dessert is sure to create cherished memories.
Quick Answer
For a delectable dessert that combines sweet and tart flavors, try this easy apple crisp recipe—perfect for any occasion!
Why You’ll Love This Recipe
This apple crisp recipe is sure to become a fall favorite for many reasons:
- Easy to prepare with minimal effort required.
- Utilizes simple, wholesome ingredients typically found in your kitchen.
- Versatile dessert perfect for any gathering or family dinner.
- Delivers a warm, comforting treat that evokes memories of home.
- Customizable with options for nuts or additional spices to fit your palate.
- Serves well warm with ice cream or caramel for an extra special touch.
What Makes This Recipe Special
This apple crisp stands out due to its balance of flavors and textures. The tartness of the Granny Smith apples creates a perfect counterbalance to the sweetness of the brown sugar and the crunchy oat topping. Furthermore, the incorporation of lemon juice elevates the apple’s natural tartness, enhancing the overall flavor profile. Each layer is simplified yet thoughtfully designed, ensuring that every ingredient plays its part harmoniously, from the buttery crunch on top to the flavorful apple filling beneath. It’s a classic dessert that never goes out of style and brings applause with each bite, whether enjoyed after dinner or as a treat during the day.
Kitchen Tools You’ll Need
- 9 by 13 inch baking dish – perfect size for cooking the apple crisp evenly.
- Mixing bowls – essential for tossing the apple filling and the topping together.
- Measuring cups and spoons – for accurate ingredient portions.
- Cutting board and knife – necessary for slicing the apples evenly.
- Whisk – helpful for mixing dry ingredients together smoothly.
Ingredients
Granny Smith apples: Provides a tart flavor that brightens the dish and holds up well during baking.
fresh lemon juice: Enhances flavor while preventing the apples from browning.
brown sugar: Adds sweetness and depth with its caramel notes.
all purpose flour: Helps bind the topping and create a clumpy texture.
ground cinnamon: Imparts warmth and adds a fragrant spice note.
old fashioned oats: Offers a hearty texture and chewiness to the topping.
packed brown sugar: Deepens the sweetness and helps create a crunchy topping.
chopped pecans: Adds a nutty crunch (optional).
fine sea salt: Balances the sweetness and enhances overall flavor.
melted butter: Contributes richness and aids in creating a crispy topping.
Ready to cook? Scroll to the recipe card below for exact measurements.
How to Make Apple Crisp
Phase 1 – Prep
STEP 1. Preheat your oven. Heat the oven to 350 degrees F.
STEP 2. Prepare the baking dish. Grease a 9 by 13 inch baking dish with cooking spray or butter.
STEP 3. Mix the apple filling. In a large mixing bowl, toss together the apples and lemon juice until evenly combined.
STEP 4. Add spices and sugar. Add the brown sugar, flour, and cinnamon, then toss until evenly combined.
STEP 5. Transfer the mixture. Transfer the apples to the prepared baking dish and spread out in an even layer.
Phase 2 – Cook
STEP 6. Combine the topping ingredients. In the same mixing bowl, stir together the oats, flour, brown sugar, pecans, cinnamon, and salt until combined.
STEP 7. Add melted butter. Drizzle the melted butter over the mixture, then briefly toss until combined, keeping the topping clumpy.
STEP 8. Spread the topping. Sprinkle the mixture evenly over the apple filling.
STEP 9. Bake. Bake for 40 to 50 minutes, or until the apple filling is bubbly and the topping is crisp.
STEP 10. Cool down. Transfer to a wire baking rack.
Phase 3 – Serve
STEP 11. Enjoy. Serve warm with vanilla ice cream and caramel sauce if desired.
STEP 12. Store leftovers. Any leftover apple crisp can be refrigerated in a sealed container for up to 3 days or frozen for up to 3 months.
Why This Recipe Works
The balance of textures in this recipe is truly noteworthy; the smoothness of the warm apples contrasts with the crunchy topping, providing a satisfying bite. Furthermore, layering flavors is essential; the sweet apples work harmoniously with the rich, nutty notes of the topping, resulting in a dessert that delights the palate. The cooking method also contributes to this dish’s success, as baking allows flavors to meld and develop while creating a perfectly crispy finish on top. This recipe makes the most of simple ingredients, transforming them into a warm, comforting dish that’s hard to resist.
Pro Tips
1. Choose apples that hold up well during baking, such as Granny Smith for their flavor and texture.
2. For an extra layer of flavor, consider adding a splash of vanilla extract to the apple mixture.
3. To make the topping even crispier, let it bake until golden brown.
4. If using nuts, chop them coarsely for added crunch and even distribution.
5. Allow the crisp to cool slightly before serving to help the topping set, making it easier to serve.
6. Experiment with additional spices like nutmeg or ginger for a unique twist.
Common Mistakes to Avoid
Mistake: Using the wrong type of apples.
Why it happens: Some apples are too soft and turn mushy.
How to fix it: Stick to firm, tart apples like Granny Smith for the best results.
Mistake: Not greasing the baking dish properly.
Why it happens: Leads to sticking and uneven cooking.
How to fix it: Ensure the dish is evenly greased with cooking spray or butter before adding the mixture.
Mistake: Overbaking the crisp.
Why it happens: It may result in tough topping.
How to fix it: Keep an eye on the oven; bake until the topping is golden brown and the filling is bubbly.
Mistake: Skipping the resting time after baking.
Why it happens: It can make serving difficult.
How to fix it: Let the apple crisp cool slightly for better serving.
Variations
- Add dried cranberries for a tart twist.
- Use maple syrup in place of brown sugar for a different sweetness.
- Incorporate pears with the apples for added flavor.
- Make it gluten-free by substituting with gluten-free flour and oats.
- Add a dash of nutmeg or ginger for a spiced version.
Nutrition Highlights
| Nutrient | Role |
|---|---|
| Fiber | Aids digestive health and supports a feeling of fullness. |
| Vitamins | Provides essential nutrients like Vitamin C from apples. |
| Healthy fats | Found in nuts, support heart health and overall wellness. |
Serving Ideas
This apple crisp pairs beautifully with several options that heighten its delightful taste. Consider serving it warm with a generous scoop of vanilla ice cream or a dollop of freshly whipped cream to add creaminess and balance the sweetness. Drizzling homemade caramel sauce over the top can elevate the dessert to a special occasion treat. For a more indulgent experience, consider serving alongside a rich, spiced chai latte or a steaming cup of tea, making it an excellent dessert choice for gatherings or afternoon tea.
Best Occasions for This Recipe
This delightful apple crisp is perfect for multiple occasions, from family gatherings and holiday celebrations to cozy evenings at home. It’s an excellent addition to Thanksgiving dinner, as the comforting flavors embody the season’s spirit. Serve it during a casual friends’ get-together or at a potluck—everyone will love it! It’s also a simple yet satisfying dessert for a weeknight treat after dinner. With its universally appealing flavors, it’s a cherished staple for any recipe collection.
Meal Prep & Storage
Meal Prep
You can prepare the apple filling and topping ahead of time, storing them separately in the refrigerator. Assemble the dish before baking for a fresh dessert whenever needed.
Refrigeration
Store any leftover apple crisp in a sealed container in the refrigerator for up to three days. The flavors will continue to develop, making it just as delicious for a second serving.
Freezing
For longer storage, you can freeze apple crisp. Cover it tightly with plastic wrap or aluminum foil and store it for up to three months. It can be baked straight from frozen, just add a few extra minutes to the baking time.
Reheating
Reheat individual servings in the microwave for a quick treat or warm the entire dish in the oven at a low temperature until heated thoroughly. The oven method will help revive the crispness of the topping.
{image_template}
FAQs
Can I use a different type of apple?
Absolutely! While Granny Smith apples are ideal for their tartness and firmness, you can experiment with other varieties like Honeycrisp or Braeburn for different flavor profiles.
How can I make this recipe vegan?
You can substitute the butter with a plant-based alternative and use maple syrup instead of brown sugar for a vegan version that still tastes amazing.
Can I prepare this ahead of time?
Yes, you can prepare the filling and topping in advance. Store them separately in the fridge and assemble before baking when you’re ready to enjoy it.
How long will leftovers last?
Leftovers can be stored in a sealed container in the refrigerator for up to three days or frozen for up to three months without compromising flavor.
What’s the best way to serve apple crisp?
For a delicious treat, serve warm with a scoop of vanilla ice cream, whipped cream, or a drizzle of caramel sauce.
Save This Recipe for Later
If you enjoyed this and want to revisit the comforting flavors of apple crisp, be sure to save this recipe to your favorite boards on Pinterest or bookmark it for your next baking adventure!
Conclusion
Incorporating fresh apples and a buttery topping, this comforting apple crisp is a delightful dessert that highlights the best of fall flavors. With its simple preparation and irresistible aroma wafting through your home, it brings everyone together for a fun and satisfying experience. Whether you’re hosting a gathering or simply seeking a weekly treat, this recipe is the key to heartwarming moments and delicious memories. Don’t forget to save a piece or two for later, as the flavors only continue to improve!
Apple Crisp
Ingredients
Method
- Preheat your oven to 350 degrees F.
- Grease a 9 by 13 inch baking dish with cooking spray or butter.
- In a large mixing bowl, toss together the apples and lemon juice until evenly combined.
- Add the brown sugar, flour, and cinnamon, then toss until evenly combined.
- Transfer the apple mixture to the prepared baking dish and spread out in an even layer.
- In the same mixing bowl, stir together the oats, flour, brown sugar, pecans, cinnamon, and salt until combined.
- Drizzle the melted butter over the mixture, then briefly toss until combined, keeping the topping clumpy.
- Sprinkle the topping mixture evenly over the apple filling.
- Bake for 40 to 50 minutes, or until the filling is bubbly and the topping is crisp.
- Transfer to a wire cooling rack.
- Serve warm with vanilla ice cream and caramel sauce if desired.
- Store any leftovers in a sealed container for up to 3 days or freeze for up to 3 months.