
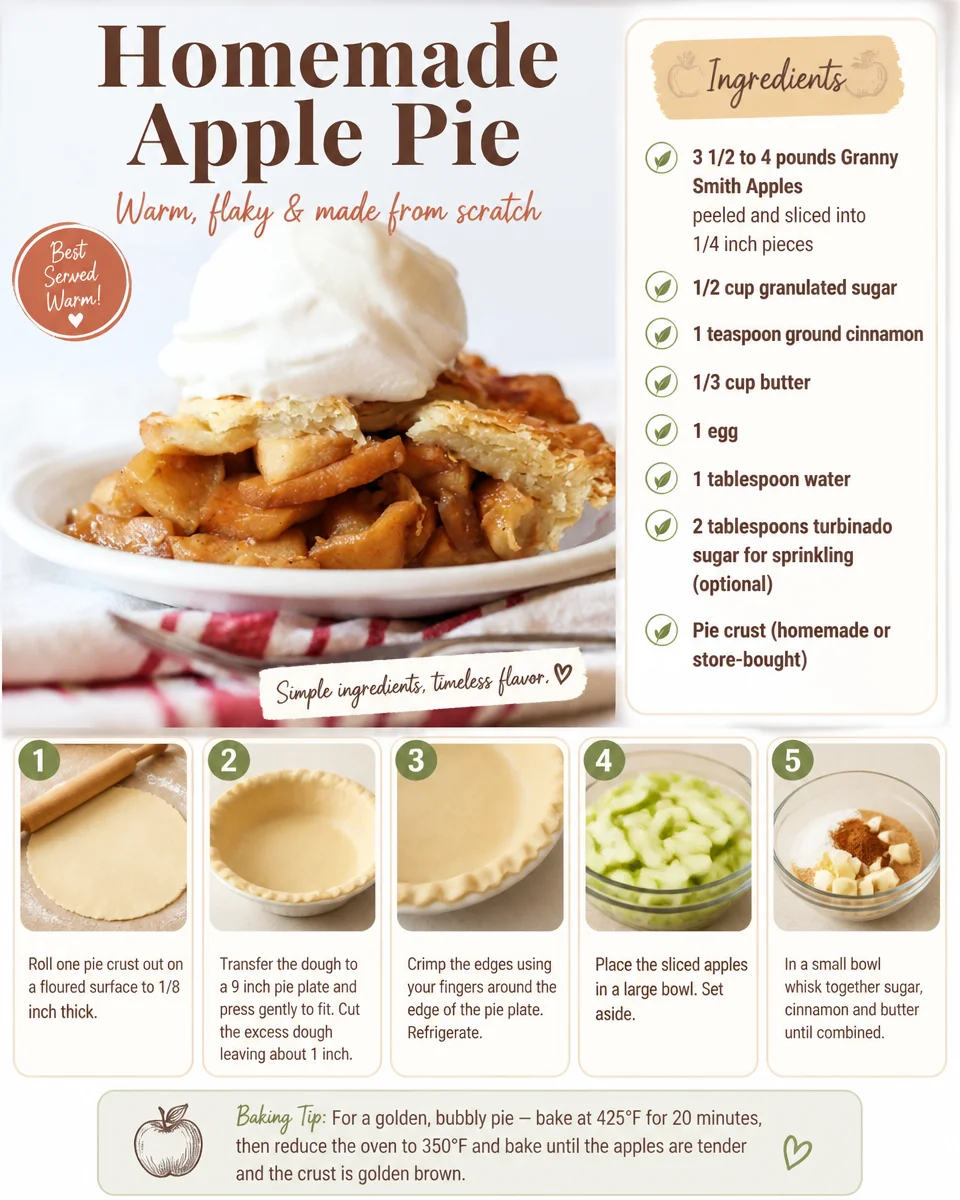
There’s something irresistibly comforting about a warm slice of pie, especially when it’s filled with juicy, tart apples. The sweet aroma of cinnamon and baked crust wafts through the air, inviting you to take a seat at the table. This pie not only brings a sense of nostalgia but also delights your taste buds with its balanced flavor profile. Whether enjoyed on a chilly afternoon or served as a centerpiece at gatherings, it’s sure to create lasting memories.
Imagine sinking your fork into a flaky, golden crust, revealing the tender, spiced apple filling beneath. This homemade apple pie is the perfect combination of crispy, juicy, and sweet, appealing to people of all ages. Whether you’re a beginner baker or a seasoned pro, this recipe will guide you through each step, ensuring your creation is both beautiful and delicious. So, let’s roll up our sleeves and get started!
Quick Answer
This homemade apple pie highlights a luscious apple filling spiced with cinnamon, all wrapped in a flaky crust, and baked to golden perfection. It’s perfect for any occasion.
Why You’ll Love This Recipe
This homemade apple pie is a delightful treat that everyone can appreciate. With its simple yet rich flavors, it’s a recipe you’ll want to make time and time again.
- Classic Comfort Food: A beloved dessert that warms the heart.
- Easy to Make: Simple steps ensure a successful bake every time.
- Versatile: Perfect for any occasion, from holidays to family dinners.
- Scratch Made: Provides a homemade taste that’s far superior to store-bought.
- Appealing Aroma: The scent of baking apples and cinnamon fills your home.
- Family-Friendly: A dessert that appeals to both kids and adults.
What Makes This Recipe Special
This homemade apple pie is a true classic that blends the tartness of Granny Smith apples with a hint of sweetness and warmth from cinnamon. The unique process of sautéing the apples enhances their flavor and creates a delicious caramelized edge. With the option to choose between a double layer or lattice crust, you can customize your pie to your liking. The golden crust turns crispy as it bakes, providing the perfect contrast to the tender apple filling. This pie brings together simple ingredients to create a comforting dessert that becomes a cherished tradition.
Kitchen Tools You’ll Need
- Rolling Pin – Essential for rolling out the pie crust to the perfect thickness.
- Pie Plate – A 9-inch plate to hold your delicious filling and crust.
- Sharp Knife – Useful for cutting apples and trimming the pie crust.
- Skillet – Ideal for sautéing the apples to enhance their flavor.
- Pastry Brush – Perfect for applying the egg wash to the top crust.
- Measuring Cups – For accurately measuring the ingredients.
Ingredients
Granny Smith Apples: Tart and firm, they hold their shape when baked, providing a wonderful texture and flavor.
Granulated Sugar: Adds sweetness to balance the tartness of the apples.
Ground Cinnamon: Infuses the filling with warm, aromatic spice, enhancing the overall flavor.
Butter: Contributes richness and flavor while creating a beautifully flaky crust.
Egg: Helps bind ingredients together and adds a golden color to the crust.
Water: Assists in the dough formation, providing moisture without altering flavor.
Turbinado Sugar: Optional sprinkle for added crunch and sweetness on top of the crust.
Pie Crust: Acts as the foundation for the pie, providing a flaky and tender texture.
Ready to cook? Scroll to the recipe card below for exact measurements.
How to Make Homemade Apple Pie
Phase 1 – Prep
STEP 1. Roll Out Dough. Roll one pie crust out on a floured surface to 1/8 inch thick.
STEP 2. Transfer Dough. Transfer the dough to a 9 inch pie plate and press gently to fit.
STEP 3. Cut Excess Dough. Cut the excess dough hanging over the edges, leaving about 1 inch.
STEP 4. Crimp Edges. Crimp the edges using your fingers around the edge of the pie plate.
STEP 5. Refrigerate Dough. Refrigerate the dough to chill while preparing the filling.
STEP 6. Prepare Apples. Place the sliced apples in a large bowl and set aside.
STEP 7. Mix Sugar and Cinnamon. In a small bowl, combine the granulated sugar and cinnamon.
STEP 8. Coat Apples. Sprinkle sugar mixture over the apples, tossing to coat.
Phase 2 – Cook
STEP 9. Heat Skillet. Heat a large skillet over medium-high heat and melt half of the butter.
STEP 10. Sauté Apples. Pour half of the apples into the hot skillet and fry for 6 to 7 minutes until slightly softened and caramelized at the edges.
STEP 11. Cool Apples. Remove the apples and sauce from the skillet and let cool completely.
STEP 12. Repeat Cooking. Repeat with the remaining butter and apples until all are cooked.
STEP 13. Add Apples to Crust. Once the apples are cooled, remove the pie crust from the refrigerator and pour the apples into the crust.
STEP 14. Preheat Oven. Preheat oven to 375°F.
STEP 15. Roll Out Dough. Roll out the remaining pie dough on a lightly floured surface to 1/8 inch thick.
STEP 16. Top with Crust. For a double layer crust, place the pie dough on top of the apples, cutting the excess dough at the edge.
STEP 17. Crimp Crust. Crimp the pie crust together with the bottom crust.
STEP 18. Create Vents. Make 4 slices in the top of the dough to vent steam.
STEP 19. Brush with Egg. Whisk together the egg and water, then lightly brush the egg mixture on top of the pie dough.
STEP 20. Sprinkle Sugar. Sprinkle with turbinado sugar, if desired.
STEP 21. Bake Pie. Bake for 45 to 50 minutes until golden.
STEP 22. Cool Pie. Allow your pie to cool for at least 1 hour before slicing.
Phase 3 – Serve
Slice your beautifully baked pie and serve with a scoop of vanilla ice cream for an extra treat. Enjoy each comforting bite of this classic dessert!
Why This Recipe Works
The texture of this apple pie strikes a perfect balance between the tender apples and the flaky crust, creating a delightful mouthfeel. Sautéing the apples not only caramelizes their natural sugars but also intensifies their flavor, layering the taste with warmth from the cinnamon. The combination of buttery crust and spiced filling adds richness, while the double layer or lattice crust allows for visual appeal and texture variety. Baking the pie at the right temperature ensures a golden crust that holds the filling perfectly, providing satisfaction in every slice.
Pro Tips
For the best results when making your homemade apple pie, here are some invaluable tips:
- Choose a mix of apples for a complex flavor, balancing tart and sweet varieties.
- Keep your butter cold when making the crust to ensure flaky layers.
- Let the pie cool for at least an hour to allow the filling to set.
- Use a pie shield or foil around the edges to prevent over-browning.
- Experiment with spices by adding nutmeg or ginger for an extra kick.
- Store leftover pie covered at room temperature for up to two days for the best flavor.
Common Mistakes to Avoid
- Mistake: Not using the right apple variety.
- Why it happens: Many people use sweet apples which can lead to a mushy filling.
- How to fix it: Always choose tart apples like Granny Smith for better texture and flavor.
- Mistake: Overworking the dough.
- Why it happens: Hand mixing can sometimes lead to a tough crust.
- How to fix it: Mix the dough just until combined, and chill well before rolling.
- Mistake: Slicing pie too soon.
- Why it happens: Impatience to enjoy the pie can compromise the filling.
- How to fix it: Always allow the pie to cool completely for at least one hour.
- Mistake: Not venting the top crust.
- Why it happens: Forgetting to create steam vents can result in a soggy crust.
- How to fix it: Always cut slits in the top crust before baking.
Variations
- Add caramel sauce for a rich twist.
- Substitute half of the apples with pears for a different flavor.
- Add dried cranberries or raisins for a chewy texture.
- Use a mix of spices like nutmeg or allspice.
- Make mini pies using muffin tins for individual servings.
Nutrition Highlights
| Nutrient | Role |
|---|---|
| Fiber | Promotes digestive health and helps keep you full. |
| Vitamin C | Supports immune function and skin health. |
| Calcium | Essential for strong bones and teeth. |
| Antioxidants | Help in fighting free radicals and reducing inflammation. |
Serving Ideas
Pair your homemade apple pie with a scoop of vanilla bean ice cream for a delightful contrast. Serve it warm, drizzled with caramel sauce, for an extra indulgence. For a twist, add a dollop of whipped cream or a sprinkle of nuts over the top. Fresh apple slices can also be a crisp and refreshing complement to the warm pie.
Best Occasions for This Recipe
This classic dessert is a great choice for holiday gatherings, family celebrations, or cozy dinners at home. It’s perfect for Thanksgiving, Christmas, or simply as a delightful weekend treat. The comforting flavors make it an excellent option for fall and winter months, while its appeal transcends seasonal boundaries.
Meal Prep & Storage
Meal Prep
You can prepare the pie crust a day ahead of time and store it in the refrigerator. The apple filling can also be prepped and refrigerated, making assembly quick and easy before baking.
Refrigeration
To store leftovers, cover the pie with plastic wrap or aluminum foil. It can be kept at room temperature for up to two days or refrigerated for about a week.
Freezing
Apple pie can be frozen either baked or unbaked. Wrap it tightly in plastic wrap and then in aluminum foil for up to three months. When ready to bake, it’s best to thaw in the refrigerator overnight.
Reheating
Reheat slices in the oven at a low temperature until warmed through, or microwave individual pieces for a quick treat. Add a scoop of ice cream for a delightful experience!
{image_template}
FAQs
How long does homemade apple pie last?
Answer: When stored properly, apple pie lasts about two days at room temperature, or up to a week in the refrigerator. If frozen, it can last several months.
Can I use other types of apples?
Answer: Yes, while Granny Smith apples are ideal, consider mixing them with other apple varieties for added flavor and texture. Just ensure they hold their shape during baking.
What can I do if my pie crust is too tough?
Answer: If your crust turns out tough, it may have been overworked. For the next pie, handle the dough as little as possible, and keep your ingredients cold.
How do I know when my pie is done baking?
Answer: The pie is done when the crust is golden brown, and the filling is bubbling through the vents. Allow it to cool before slicing to set the filling.
Can I make this pie dairy-free?
Answer: Absolutely! Use a dairy-free butter substitute in the crust and filling, and the recipe will be just as delicious.
Save This Recipe for Later
If you enjoyed this homemade apple pie recipe, consider pinning it to your favorite Pinterest boards for easy access later. Your future self will thank you!
Conclusion
This classic homemade apple pie is more than just a dessert; it’s a warm embrace captured in a flaky crust, filled with perfectly spiced apples. With each bite, you experience the comforting taste of tradition and the joy of creating something special from scratch. Whether served at a family gathering or enjoyed quietly at home, it promises to be a hit every time. So grab those apples and get baking—you won’t regret indulging in this delicious masterpiece!
Homemade Apple Pie
Ingredients
Method
- Roll one pie crust out on a floured surface to 1/8 inch thick.
- Transfer the dough to a 9 inch pie plate and press gently to fit.
- Cut the excess dough hanging over the edges, leaving about 1 inch.
- Crimp the edges using your fingers around the edge of the pie plate.
- Refrigerate the dough to chill while preparing the filling.
- Place the sliced apples in a large bowl and set aside.
- In a small bowl, combine the granulated sugar and cinnamon.
- Sprinkle the sugar mixture over the apples, tossing to coat.
- Heat a large skillet over medium-high heat and melt half of the butter.
- Pour half of the apples into the hot skillet and sauté for 6 to 7 minutes until slightly softened.
- Remove the apples and let cool completely.
- Repeat with the remaining butter and apples until all are cooked.
- Once the apples are cooled, pour them into the crust.
- Preheat oven to 375°F.
- Roll out the remaining pie dough to 1/8 inch thick.
- Place the pie dough on top of the apples and cut the excess dough.
- Crimp the pie crust together with the bottom crust.
- Make 4 slices in the top of the dough to vent steam.
- Whisk together the egg and water, then brush the egg mixture on top.
- Sprinkle with turbinado sugar, if desired.
- Bake for 45 to 50 minutes until golden.
- Allow your pie to cool for at least 1 hour before slicing.
- Slice your baked pie and serve with a scoop of vanilla ice cream.