

Cooking for family gatherings can sometimes feel like an uphill battle, especially when juggling busy schedules and health goals. That’s where Cheesy Texas Trash Dip comes in, providing not just a deliciously cheesy experience, but also a solution to cooking fatigue. This recipe is the ultimate crowd-pleaser, packed with flavor and nutrition, making it a must-have for your next family gathering. With just a handful of ingredients and a few straightforward steps, you can create a dish that marries comfort food with health-conscious eating, all while sticking to your budget.
Kitchen Frustration That Makes This Recipe a Lifesaver
Every one of us has faced the challenge of what to serve during family get-togethers. The risk of cooking fatigue looms large, and we often find ourselves reaching for the same old dishes. But what if you could surprise your loved ones with something that is both new and reminiscent of cherished memories? This is where Cheesy Texas Trash Dip shines in the kitchen.
As a meal prep-friendly option, it allows you to plan ahead while keeping your calorie-conscious goals in mind. Imagine your loved ones gathered around the table, dipping tortilla chips into a warm, cheesy blend of refried beans, cream cheese, and flavorful spices. It’s not just about the taste; it’s about creating moments, exchanging stories, and nurturing bonds. The ease of preparation makes this recipe a time-saver, giving you more time to spend with those who matter. You’ll find that this dip isn’t just food; it’s a remedy for mealtime stress.
Why This Cheesy Texas Trash Dip Works So Well
Quick Answer: This dip combines creamy textures, bold flavors, and a protein-packed profile to create a hearty, satisfying dish perfect for any occasion.
What makes Cheesy Texas Trash Dip truly special is its texture and abundant flavor. The creaminess of the cream cheese and sour cream balances beautifully with the hearty refried beans. Toss in the zesty green chiles and taco seasoning, and you’ve got a flavor explosion that makes this dish addictively delicious.
Additionally, this dip caters to a variety of nutrition goals. By offering a blend of protein, healthy fats, and fiber, it fits seamlessly into any meal plan while appealing to the whole family. Whether you are looking to feed a crowd or just want a comforting snack during family movie night, Cheesy Texas Trash Dip is the answer, making it a versatile addition to your recipe lineup.
Ingredients, Substitutions & Foolproof Tips
- 8 ounces cream cheese: Adds creaminess; consider using reduced-fat for a lighter option.
- 1 cup sour cream: Provides texture; Greek yogurt can be a healthier substitute.
- 32 ounces refried beans: The protein-packed base of the dip; can use black beans for added flavor.
- 7 ounces canned chopped green chiles, drained: Adds a mild spice; jalapeños can be used for heat.
- 1 package McCormick Taco Seasoning Mix: The secret flavor booster; homemade seasoning can be an alternative.
- 4 cups shredded Mexican cheese blend, divided: Provides that gooey, cheesy goodness; try a combination of cheddar and Monterey Jack as an alternative.
- Chopped green onion, for serving: Fresh garnish to lighten the dish.
- Sliced black olives, for serving: Adds a salty crunch; optional based on personal preference.
Step-by-Step Directions
- Preheat the oven: Preheat your oven to 350F. This temperature is ideal for melting the cheese to perfection.
- Microwave the cream cheese and sour cream: In a large microwaveable bowl, microwave the cream cheese and sour cream on HIGH for 1 minute or until softened. This key step ensures a creamy dip.
- Whisk until smooth: Remove the bowl from the microwave and mix the softened ingredients with a wire whisk until smooth. The goal is a creamy and blended base that isn’t lumpy.
- Combine all ingredients: Add the refried beans, green chiles, taco seasoning mix, and 2 cups of the shredded cheese. Mix well to ensure every bite is flavorful.
- Prepare the baking dish: Spray a 13X9 inch baking dish with no-stick cooking spray and spread the bean mixture evenly into the dish.
- Add remaining cheese: Sprinkle the remaining 2 cups of cheese evenly over the top. This creates a delicious, melty crust when baked.
- Bake: Place the dish in the preheated oven and bake for 25 minutes. Look for the cheese to be melted and bubbly, signaling that it’s ready to serve.
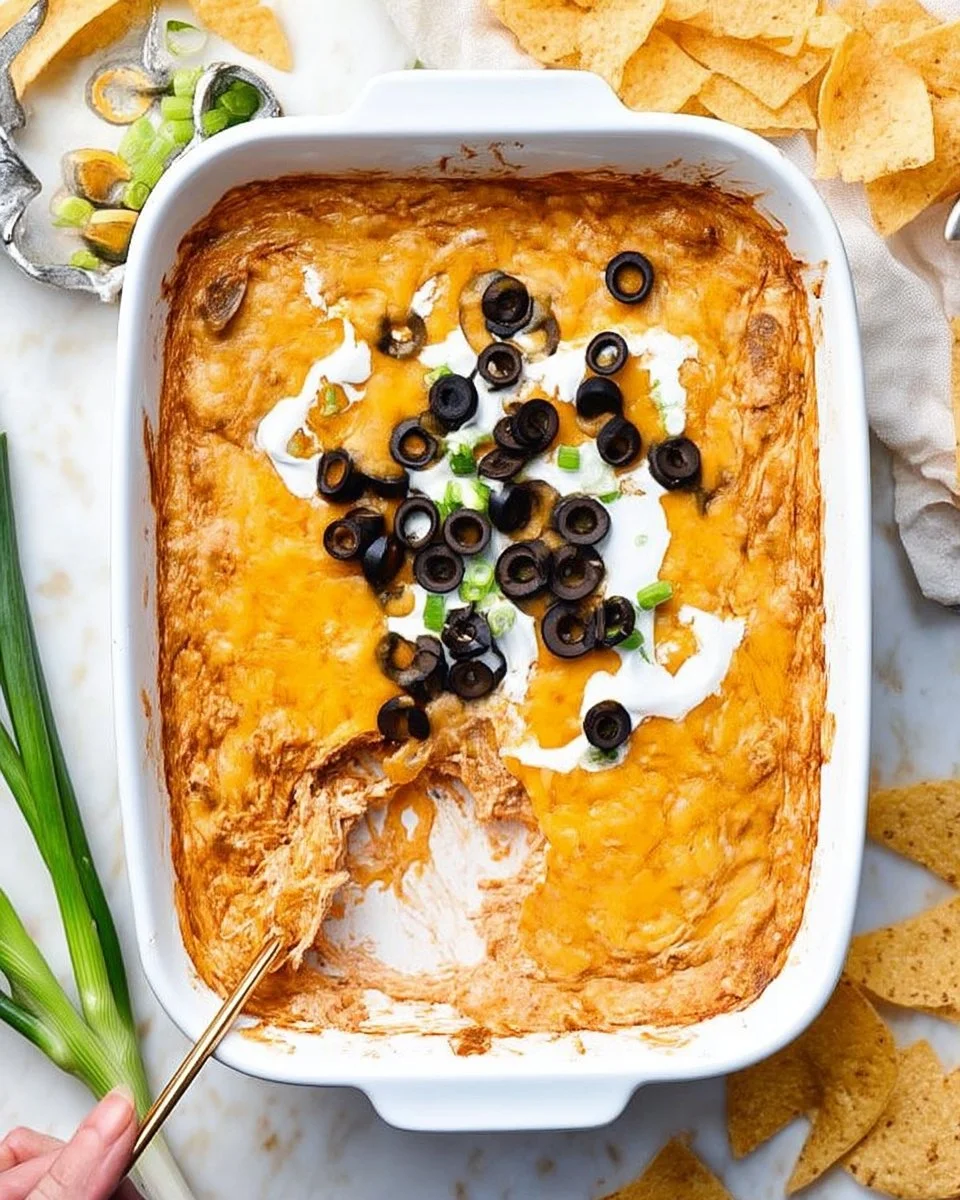
- Garnish and serve: Remove from the oven, then garnish with chopped green onions and sliced black olives. Serve warm with tortilla chips.
Common Mistakes to Avoid & Pro Tips
- Mistake: Not letting cream cheese soften.
- Fix: Always microwave until sufficiently softened for easy mixing.
- Mistake: Overbaking the dip.
- Fix: Monitor closely to avoid browning, as overbaking can lead to a rubbery texture.
- Mistake: Forgetting to drain the green chiles.
- Fix: Drain well to prevent a watery dip.
Pro Tips:
- Use a hand mixer for creaminess if you want an ultra-smooth texture.
- Pair this dip with fresh veggie sticks for a healthier alternative.
- Consider setting aside some cheese for topping after baking for an extra melty finish.
Serving, Storage & Freezer Guide
How to Serve Cheesy Texas Trash Dip
Cheesy Texas Trash Dip is best served warm, as the melted cheese and creamy mixture create an inviting dip experience. Serving alongside crispy tortilla chips, pita chips, or fresh veggies makes for a delightful presentation and offers something for everyone. You can also set up a fun dipping bar with various toppings like salsa, guacamole, and additional green onions.
How to Store Cheesy Texas Trash Dip
After enjoying your dip, store leftovers in an airtight container in the refrigerator. Make sure to allow it to cool completely before sealing to maintain its texture. The dip can stay fresh in the fridge for about 3-4 days, making it excellent for meal prep or leftovers.
Can You Freeze Cheesy Texas Trash Dip?
Yes, you can freeze Cheesy Texas Trash Dip! To freeze the dip, allow it to cool completely, then place it in a freezer-safe container. It can be frozen for up to 2 months. When you’re ready to enjoy it again, simply thaw in the refrigerator overnight and reheat in the oven or microwave until warm.
Frequently Asked Questions
What can I serve with Cheesy Texas Trash Dip?
Cheesy Texas Trash Dip pairs wonderfully with tortilla chips, pita chips, and fresh veggies. You can also offer various toppings like guacamole or salsa for added flavor.
Can I make Cheesy Texas Trash Dip ahead of time?
Absolutely! You can prepare the dip a day in advance and store it in the fridge, then bake it when you’re ready to serve.
How spicy is this dip?
This dip has a mild kick from the green chiles. If you prefer a spicier version, consider adding jalapeños or using a spicy taco seasoning mix.
Can I use low-fat ingredients for a healthier version?
Definitely! You can substitute reduced-fat cream cheese, sour cream, and cheese blends without sacrificing too much flavor or texture.
Conclusion
In a world where cooking can often feel overwhelming, Cheesy Texas Trash Dip provides a simple, nourishing solution that combines nostalgia with convenience. This dip is not just another snack; it’s a reminder of joyful family moments filled with laughter and connection.
If this recipe reminds you of someone you love, share it with them. Your memories keep recipes alive.

Cheesy Texas Trash Dip
Ingredients
Method
- Preheat your oven to 350F.
- In a large microwaveable bowl, microwave the cream cheese and sour cream on HIGH for 1 minute or until softened.
- Remove the bowl from the microwave and mix the softened ingredients with a wire whisk until smooth.
- Add the refried beans, green chiles, taco seasoning mix, and 2 cups of the shredded cheese. Mix well to ensure every bite is flavorful.
- Spray a 13X9 inch baking dish with no-stick cooking spray and spread the bean mixture evenly into the dish.
- Sprinkle the remaining 2 cups of cheese evenly over the top.
- Place the dish in the preheated oven and bake for 25 minutes until the cheese is melted and bubbly.
- Remove from the oven and garnish with chopped green onions and sliced black olives. Serve warm with tortilla chips.