
Cooking can sometimes feel like a laborious task, especially after a long day or when trying to stick to a meal plan. However, if you’re craving that comforting crunch of fried chicken without the guilt of excessive calories or the hassle of deep frying, this Crispy Oven Fried Chicken is a perfect solution. This recipe is not only high protein but also a family favorite that can effortlessly feed a crowd while keeping your health-conscious goals in mind.
Kitchen Frustration That Makes This Recipe a Lifesaver
We’ve all been there: staring at the fridge, scavenging for ideas, and feeling the weight of meal fatigue. The guilt of ordering takeout looms as cooking feels too demanding. That’s where this crispy oven fried chicken truly shines. It combines the nostalgic crunch of traditional fried chicken with the convenience of an oven. Imagine surprising your family with this comforting meal while feeling proud of your calorie-conscious choice. The best part? It’s easy to prepare. Just a few simple ingredients, and you’ll have a delicious dish that’s both satisfying and budget-friendly.
If you’re struggling to maintain your meal plan or simply need to whip up dinner quickly, this recipe is a lifesaver. Prepare it ahead of time to save stress on busy weekdays, ensuring everyone at the table eats well without breaking the bank on takeout.
Why This Crispy Oven Fried Chicken Works So Well
Quick Answer: This recipe for Crispy Oven Fried Chicken utilizes a high-temperature oven method and a special breading technique to achieve a crunchy exterior while keeping the chicken tender on the inside.
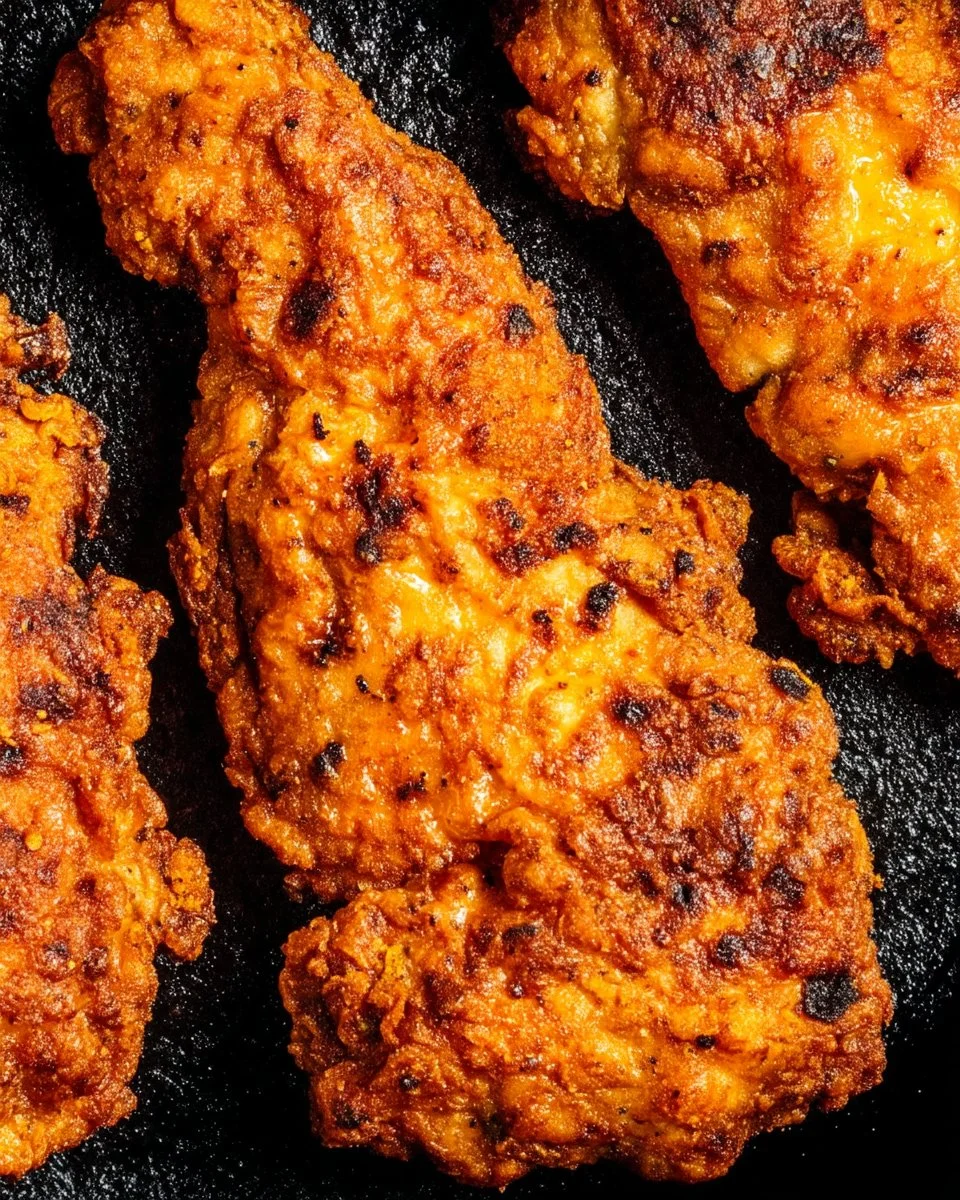
The brilliance of this recipe stems from both its simplicity and effectiveness. The chicken strips are coated in a delicious mixture of flour and breadcrumbs, enhanced by savory spices like paprika and garlic powder. Baking at 410°F creates a beautifully crispy texture, while the butter adds a rich flavor that elevates the dish without the added calories associated with frying. It’s a time-saving technique that requires minimal hands-on effort, making it the ideal choice for busy families.
Additionally, this dish aligns perfectly with health-conscious values. By opting for skinless chicken breasts and using an oven instead of a frying pan, you can enjoy a protein-packed meal that satisfies cravings and supports your nutrition goals.
Ingredients, Substitutions & Foolproof Tips
- 1 large egg: Binds the breading to the chicken.
- 1/3 cup buttermilk (or regular milk): Adds moisture and tang; can substitute with plant-based milk for dairy-free.
- 1 cup all-purpose flour: Forms the base for the crispy coating.
- 4 tablespoons breadcrumbs (Panko or Italian seasoned): Ensures extra crunch; Panko gives the best texture.
- 1 teaspoon baking powder: Lightens the breading for crispness.
- 1.5 teaspoons salt: Adjust to personal preference for taste.
- 2 teaspoons ground paprika: Provides flavor and beautiful color.
- 1 teaspoon garlic powder: Adds depth of flavor to the coating.
- 1 teaspoon onion powder: Complements the garlic for a well-rounded taste.
- 1/2 teaspoon ground pepper: Adds a little kick.
- 2 pounds boneless, skinless chicken breast, cut into strips: The heart of this dish.
- 1/4 cup butter (or more as needed): For richness; can use olive oil for a lighter option.
Step-by-Step Directions
- Prep: Heat the oven to 410°F. Place a cast iron or dark-colored pan into the oven to heat while you prepare the chicken. This will help with achieving that crispy finish.
- Prepare breading: In a medium bowl, whisk together the egg and buttermilk. In another bowl, combine flour, breadcrumbs, baking powder, and seasonings.
- Bread the chicken: Toss the chicken strips in the flour mixture first, coating well and shaking off excess. Dip them in the egg mixture, then roll them in the flour mixture again, pressing the coating firmly to adhere.
- Place chicken on the pan: Carefully take the hot pan from the oven and melt butter in it. Place the breaded chicken strips evenly on the pan, ensuring they have space between them.
- Oven fry: Bake for 10-12 minutes, then carefully flip the chicken and bake for another 5-10 minutes. Add more butter if necessary for browning. Finish by broiling the chicken until golden brown and crispy, about 1-2 minutes.
- Serve: Let the chicken rest for 2-3 minutes to retain juiciness, then serve immediately.
Common Mistakes to Avoid & Pro Tips
- Mistake: Not preheating the pan.
- Fix: Always start with a hot pan to achieve the best crispy texture.
- Mistake: Skipping the double coating.
- Fix: Coating twice helps the breading stick better and results in a crunchier exterior.
- Mistake: Overcrowding the pan.
- Fix: Space out the chicken pieces to ensure even cooking and crispiness.
- Mistake: Forgetting to flip the chicken.
- Fix: Flip halfway through to achieve a golden crust on both sides.
Pro Tips:
- Use Panko breadcrumbs for extra crunch.
- Let the chicken sit after baking to ensure juices redistribute.
- Experiment with spices in the flour mixture to create your unique flavor profile.
Serving, Storage & Freezer Guide
How to Serve Crispy Oven Fried Chicken
Crispy Oven Fried Chicken can be served alongside classic sides like mashed potatoes, a fresh green salad, or coleslaw for that perfect family-style meal. Pair it with a dipping sauce, like honey mustard or ranch, to enhance the flavor experience.
How to Store Crispy Oven Fried Chicken
To store leftover chicken, place it in an airtight container and refrigerate. It should stay fresh for up to three days. Reheat in the oven to maintain its crispiness, rather than the microwave, which can make it soggy.
Can You Freeze Crispy Oven Fried Chicken?
Yes! You can freeze the chicken. Allow it to cool completely and then transfer it to a freezer-safe container. For optimal flavor, consume it within three months. To reheat, bake from frozen at 350°F until heated through, around 25-30 minutes.

placeholder
Frequently Asked Questions
Can I use chicken thighs instead of breasts?
Absolutely! Chicken thighs can be used for a more flavorful experience. Just increase the cooking time slightly to ensure they cook through.
Can I make this in an air fryer?
Yes, the recipe can be adapted for air frying. Cook at 400°F for about 10-12 minutes, flipping halfway through for even cooking.
What can I do if I don’t have buttermilk?
You can create a buttermilk substitute by adding 1 teaspoon of white vinegar or lemon juice to 1/3 cup of regular milk and letting it sit for a few minutes.
Can I use almond flour as a gluten-free option?
Yes, almond flour can be a great gluten-free alternative, although the texture will differ slightly from traditional flour.
Conclusion
Crispy Oven Fried Chicken is more than just a dish; it’s a nostalgic comfort food that can bring the family around the table, solving the daily dilemmas of meal prep fatigue. With its high protein content and deliciously crispy texture, this recipe is budget-friendly and guilt-free. If this recipe reminds you of someone you love, share it with them. Your memories keep recipes alive.

Crispy Oven Fried Chicken
Ingredients
Method
- Preheat the oven to 410°F (210°C). Place a cast iron or dark-colored pan into the oven to heat while you prepare the chicken.
- In a medium bowl, whisk together the egg and buttermilk. In another bowl, combine flour, breadcrumbs, baking powder, and seasonings.
- Toss the chicken strips in the flour mixture first, coating well and shaking off excess. Dip them in the egg mixture, then roll them in the flour mixture again, pressing the coating firmly to adhere.
- Carefully take the hot pan from the oven and melt butter in it. Place the breaded chicken strips evenly on the pan, ensuring they have space between them.
- Bake for 10-12 minutes, then carefully flip the chicken and bake for another 5-10 minutes. Add more butter if necessary for browning. Finish by broiling the chicken until golden brown and crispy, about 1-2 minutes.
- Let the chicken rest for 2-3 minutes to retain juiciness, then serve immediately.