
You’ve had one of those long days, haven’t you? The kind that drags on, where everything seems to go awry? As you walk through the door, that familiar scent of dinner wafts from the kitchen. But wait, what’s cooking? Ah, it’s the heavenly aroma of Crispy Garlic Potatoes! Just the thought of biting into those golden, crispy wedges, with their garlicky richness and satisfying crunch, lifts your spirits. An effective pick-me-up after a weary day! In a world where everything seems fast-paced and chaotic, these delightful little potatoes remind us of life’s simple joys, the kind that come with love and home-cooked meals.
Why You’ll Love This Crispy Garlic Potatoes Recipe
Emotional Need + Daily Struggle
We often strive for comfort after a trying day, don’t we? It can feel daunting to put together a meal that calms the soul. Time can slip through our fingers, and we find ourselves too exhausted to even think about dinner. But here’s where Crispy Garlic Potatoes swoop in to save the day! Just imagine those crispy, melt-in-your-mouth potato wedges waiting for you at the table—offering that warm hug we all crave.
This Dish Solves That
What’s better than the sound of friends and family gathered around the table, indulging in the crispy goodness of these beautiful potatoes? Crispy Garlic Potatoes not only satiate the taste buds, but they also serve as a comforting reminder of countless cozy family dinners. Garlic-infused, crispy on the outside and fluffy on the inside, they’re perfect alongside any meal, from casual lunches to holiday feasts. Trust me; once you experience these Crispy Garlic Potatoes, your weary heart will be uplifted, and your family will be begging for seconds!
As a lovely accompaniment to dishes like Broccoli Cheese Soup or even paired with a hearty Chicken Tortilla Soup, there’s no denying the joy they can bring. Let’s dive into how to make them shine in your kitchen!
Ingredients Breakdown & Prep Tips
Ingredient List with Suggestions
| Ingredient | Notes |
|---|---|
| 500 g (1.1lb) potatoes (cut into wedges) | |
| 100 g (3 tbsp) breadcrumbs | |
| 1 handful vegan cheese (optional, finely grated) | |
| 3 tbsp olive oil | |
| 3 cloves garlic (minced) | |
| ½ tsp dried thyme | |
| ¼ tsp black pepper | |
| ½ tsp salt |
Prep Method with Sensory Cues
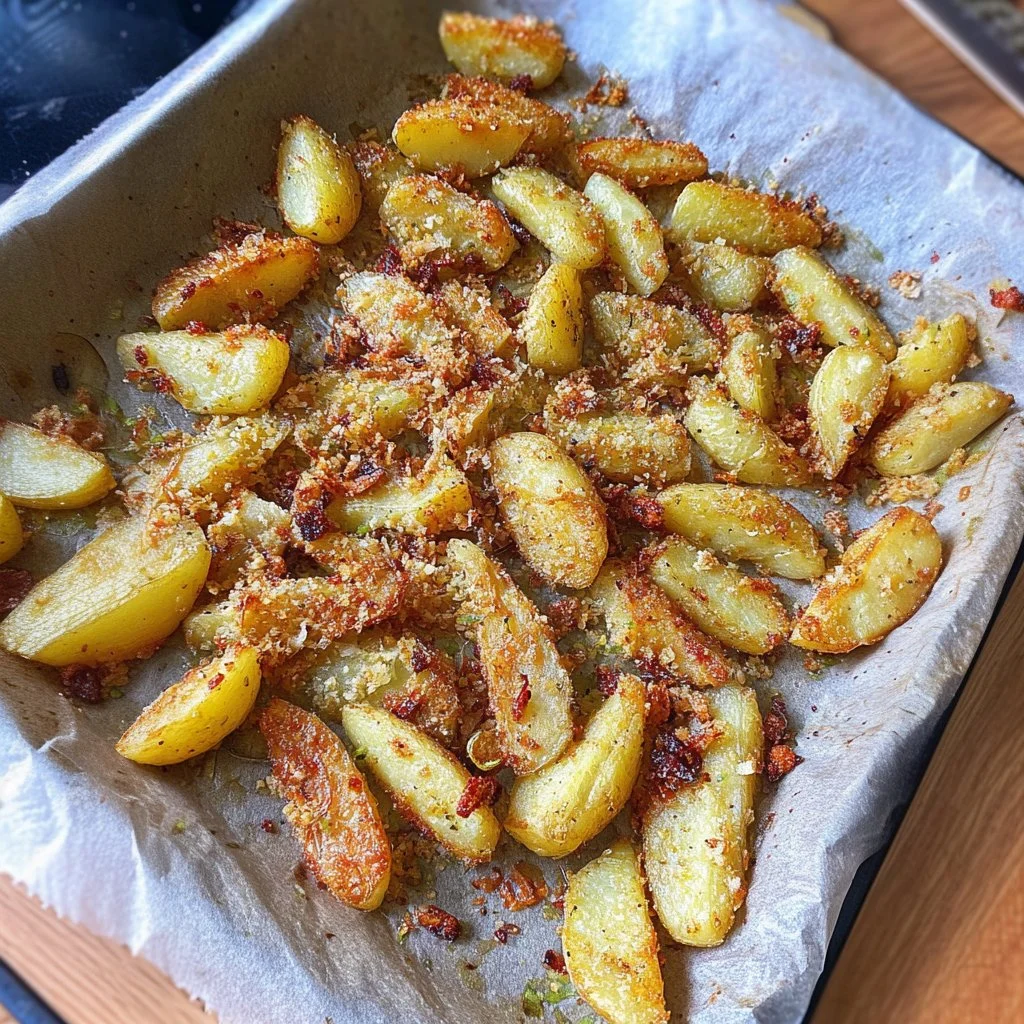
Begin your culinary adventure by bringing a large pot of salted water to a gentle boil, the steam rising like a warm embrace in the air. Once boiling, add the potato wedges, letting them cook for about 5–6 minutes until they are just tender. Drain them well and feel the texture change, firm yet soft, as you set them aside. Now, spread those wedges out on a parchment-lined baking tray, allowing them to cool for 5–10 minutes. This step is essential; it helps release the steam that could keep them from getting that glorious crispy exterior we all love.
Next, in a mixing bowl, add the breadcrumbs, olive oil, minced garlic, thyme, salt, pepper, and sprinkle in your optional vegan cheese if you’re using it. Toss everything together until each wedge is lovingly coated. Picture the beautiful ensemble of textures and scents filling your kitchen. Now, arrange those potatoes in a single layer, ensuring there’s ample space between each wedge, inviting a heavenly golden outcome. Bake at 200°C (390°F) for 35–45 minutes, turning them once halfway through until they’re perfectly golden and crispy. The moment they’re out of the oven, the delightful aroma is going to draw your family in like a warm hug!
If you fancy a delightful pairing, try serving these beauties with Black Bean Corn Salad for a refreshing twist or alongside Creamy Tortellini Soup for a full-bodied meal experience.
Avoid These Mistakes
Common Mistakes & Fixes
Sometimes, even in the kitchen, things don’t go as planned. Here are a few common mistakes and their quick fixes:
- Overcooking the Potatoes: It’s easy to overcook them in that boiling water. Aim for just tender—this ensures a crispy finish!
- Too Much Crowding on the Tray: Not leaving space can lead to soggy potatoes. Ensure each wedge has space to crisp up beautifully.
- Skipping the Cooling Step: This crucial phase releases steam, allowing the potatoes to crisp properly. Don’t skip it!
- Not Rotating During Baking: Turn them halfway for even cooking and browning—the secret for total crispiness!
Pro Tips to Get It Right
As you venture into making these Crispy Garlic Potatoes, remember that patience is key, but don’t forget to enjoy the process! Here are a few pro tips:
- Try Different Spices: Consider adding your favorite spices to this base—smoked paprika or Italian herbs can add lovely flavors!
- Experiment with Cheese: If you’re not vegan, consider real cheese to take your potatoes to the next level!
- Keep an Eye on Them: Every oven cooks a little different; watch them towards the end to achieve that perfect golden-brown crispness.
Feeling adventurous? Try pairing these with Hot Honey Chicken Tenders or a comforting Chicken Caesar Salad for a delightful dinner.
Serving, Storage & Creative Variations
Best Ways to Serve It
These crispy gems make a wonderful side dish for cozy dinners or holiday feasts. Imagine them gracing your table alongside roasted chicken or a warm veggie stir-fry. Crispy Garlic Potatoes can elevate a simple meal to something special, making weekdays feel like a treat and ensuring you leave a lasting impression on friends during gatherings!
Storage + Seasonal or Dietary Variations
Leftover Crispy Garlic Potatoes? Store them in an airtight container in the refrigerator for up to 3 days. Reheat them in the oven for the best crisp! Feel free to mix it up seasonally—add a touch of rosemary for fall or some zest of lemon for summer vibes. If you’re looking for variations, consider adding spices like cumin or curry to give it an exotic twist.
Pair them effortlessly with Easy Spicy Shrimp Tacos or a classic Creamy Parmesan One Pot Chicken and Rice for a well-rounded meal.
FAQ
Can I make Crispy Garlic Potatoes in advance? Yes, you can parboil the potatoes ahead of time, just store them in the fridge and finish the recipe when you’re ready!
What if I don’t have breadcrumbs? You can grind crackers or even use crushed cornflakes as an alternative for a crunchy texture!
Can I freeze these potatoes? While Crispy Garlic Potatoes are best enjoyed fresh, you can freeze them after baking for up to a month. Just bake them straight from frozen!
How can I make them spicier? Add a pinch of cayenne or red pepper flakes to the breadcrumb mixture before baking for a delightful kick!
Conclusion
If you’re on the lookout for a remedy to enliven your day, Crispy Garlic Potatoes might just be your answer. These delicious wedges, laced with garlic and spices, bring warmth and satisfaction like nothing else. If this dish brings back a memory, pass it on. Someone you love might need it today. Remember to check out some hearty soup recipes at Linda’s Golden Kitchen!
Crispy Garlic Potatoes
Ingredients
Method
- Bring a large pot of salted water to a gentle boil.
- Add the potato wedges and cook for about 5–6 minutes until tender.
- Drain and spread the wedges on a parchment-lined baking tray, cooling for 5–10 minutes.
- In a mixing bowl, combine breadcrumbs, olive oil, minced garlic, thyme, salt, pepper, and optional vegan cheese.
- Toss until the wedges are coated, then arrange in a single layer on the baking tray.
- Bake at 200°C (390°F) for 35–45 minutes, turning halfway through.
- Enjoy the aroma as they approach the perfect golden-brown.