
Ah, the warm scent of freshly baked bread wafting through the house—there truly isn’t anything quite like it. Picture this: you wake up on a lazy Sunday morning, and the soft sunlight streams through your kitchen window, casting a warm glow across the table. You’ve been dreaming of creating the perfect loaf of sourdough bread, one that captures that delightful crusty exterior and soft, airy interior. But maybe you’ve tried before and faced the bubbling frustration of a dense loaf or a texture that just didn’t sing. Believe me, I understand—it can feel overwhelming. However, the beauty of homemade bread transcends these little hiccups, inviting us to a world of comfort and nostalgia.
Let me guide you through this heartwarming adventure we lovingly call sourdough bread. It’s not just a recipe; it’s a chance to create a nourishing staple that fills your kitchen with warmth and joy, bringing a smile to your family’s faces.
Why You’ll Love This Sourdough Bread Recipe
The Daily Struggle
If you’ve ever found yourself staring at a store shelf filled with perfectly packaged loaves, longing for that homemade goodness, you’re not alone. Perhaps you’ve tried baking before, only to feel disheartened when your dough didn’t rise or your crust turned out tough. It’s a common struggle, yet it’s this very challenge that can be your pathway to a beautiful success. Baking sourdough bread at home is not just about making bread; it’s about creating an experience—a labor of love that’s worth every bit of effort.
This Dish Solves That
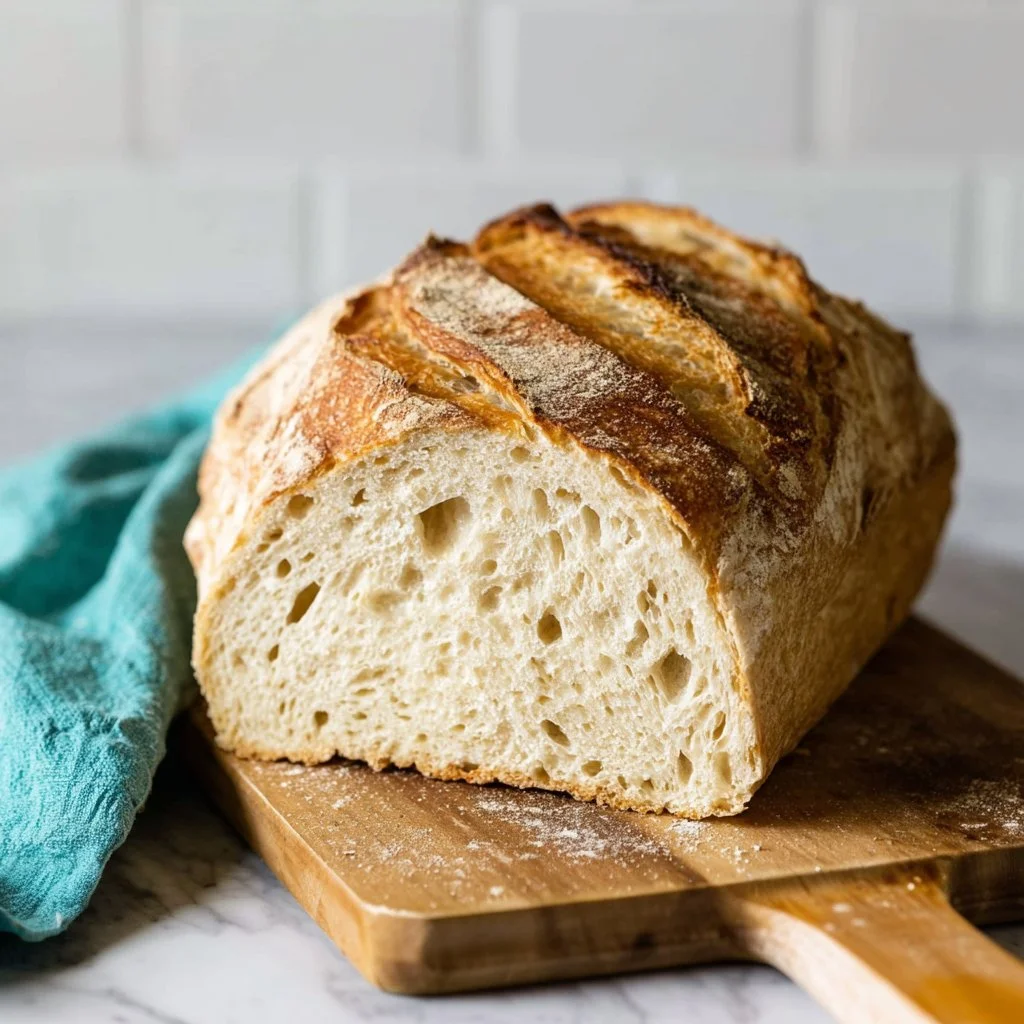
Imagine slicing through a golden crust, each cut revealing a soft, pillowy interior that could only come from your very own oven. This sourdough bread recipe is special, my friends. With just a handful of ingredients and a bit of patience, you’ll uncover the secrets of sourdough baking—every rise, every fold, every moment infused with care and flavor. There’s something incredibly rewarding about kneading dough, sensing its transformation as it becomes the bread you always dreamed it could be.
When shared with loved ones, each bite carries echoes of comfort, of laughter, of home. This is more than a recipe; it’s a connection to the past and a bridge to cherished future memories.
Quick Answer: The easiest way to make **sourdough bread** creamy and rich is by using an active starter and a good amount of hydration in your dough.
Ingredients Breakdown & Prep Tips
Ingredient List with Suggestions
Here’s what you’ll need for this lovely sourdough bread recipe:
| Ingredient | Notes |
|---|---|
| ⅔ cup (150 g) active starter | |
| 1 ⅓ cups (315 g) warm water (90°F) | Ensure it’s warm for the best results. |
| 1 ½ tablespoons (18 g) olive oil | Adds richness to the bread. |
| 3 ⅔ cups (450 g) bread flour | Offers the perfect structure for the crumb. |
| 2 teaspoons (13 g) table salt | Essential for flavor. |
| Oil for greasing pan | Prevents sticking. |
| Additional flour for dusting | Helps during shaping. |
Prep Method with Sensory Cues
Now, let’s dive into the magic of making sourdough bread.
- In a large mixing bowl, combine the sourdough starter, warm water, and olive oil. Stir until everything is well incorporated, creating a beautiful, inviting mixture that smells like yeasty heaven.
- Add the bread flour and sprinkle the salt over the top. This technique helps ensure even distribution. Stir it all together until the dough is mostly combined; it should feel shaggy and not fully cohesive—this is just perfect.
- Next, cover the bowl with plastic wrap and let it sit for one hour—this is known as the autolyse period. During this magic hour, the flour begins to absorb the water, developing an incredible texture.
- After this time, it’s time to get hands-on! Form the dough into a ball and gently stretch and fold it four times, allowing brief rest periods in between. Feel the dough transform under your hands; it will become stronger and more elastic.
- Allow the dough to rise until it has increased in size by about 80%. Depending on the warmth of your kitchen, this could take 4-6 hours. Keep an eye on it—sometimes the best things take time!
- Lightly grease a 9×5 loaf pan. Turn the dough out onto a floured surface, gently deflate it, and shape it into a rectangle before rolling it into a lovely loaf shape.
- Transfer this beauty to the prepared pan, cover it with plastic wrap, and pop it into the fridge overnight. Ah, the anticipation!
- When you’re ready to bake, preheat the oven to 450°F. After the dough has rested, score the top gently with a sharp knife—this helps control the rise during baking—and bake it covered for 30 minutes, then uncovered for another 20-23 minutes, until it’s a glorious golden brown.
- Finally, allow it to cool in the pan for 15 minutes, then finish cooling on a rack for 1-2 hours before slicing. The wait will be hard, but oh, the reward is worth it!
Avoid These Mistakes
Common Mistakes & Fixes
When crafting your sourdough bread, mistakes can happen, but they don’t have to discourage you:
- Not Using Enough Starter: Using too little starter can lead to a sluggish rise. Ensure you’re using the stated amount.
- Incorrect Water Temperature: Water that’s too hot can kill your yeast. Aim for that sweet spot of around 90°F.
- Skipping the Autolyse: This part of the process is essential for the best texture. Don’t skip it!
- Not Letting It Rise Long Enough: Patience is key here. Allow the dough to rise fully to get that airy texture.
Pro Tips to Get It Right
- Always give your dough the time it needs. The longer fermentations lead to deeper flavor.
- If you’re unsure if the dough is ready to bake, the “poke test” can be helpful: gently poke the dough; if it springs back slowly, it’s ready.
For a bit of additional inspiration, you may enjoy learning about how to create a comforting Creamy Tortellini Soup or checking out our scrumptious Creamy Garlic Parmesan Chicken Pasta.
Serving, Storage & Creative Variations
Best Ways to Serve It
This sourdough bread is perfect for cozy dinners; imagine it alongside a steaming bowl of Broccoli Cheese Soup or toasted with a smear of butter and jam for breakfast. It can also be the star of a delightful sandwich, holding in all the flavors of your favorite fillings.
Storage + Seasonal or Dietary Variations
Store your sourdough bread in a paper bag at room temperature to keep that crust just right. If you’ve made more than you can eat in a few days, freeze it! Just slice it first; this way, you can enjoy a piece whenever the craving strikes. Variations? Add herbs or garlic into the dough or mix in some cheese for a delightful twist!
To continue your culinary adventures, you might try out Easy Spicy Shrimp Tacos or a refreshing Black Bean Corn Salad alongside your sourdough creations.
FAQ SECTION
What kind of flour is best for sourdough bread?
Bread flour is your best bet for sourdough bread as it has a higher protein content, aiding in the crust and chewiness.
How long does sourdough starter last?
With proper feeding and care, your sourdough starter can last indefinitely! Just keep it in the fridge and feed it regularly.
Can I make this in a different pan?
Absolutely! You can bake it in a Dutch oven for an even crustier loaf, or use a different size loaf pan—just be mindful of baking times.
What’s the best way to slice sourdough?
Warm sourdough is tricky to slice; let it cool fully, then use a serrated knife for perfect slices without squishing.
Conclusion
And there you have it! A tried and true sourdough bread recipe awaits you to enjoy and share. As you knead and shape, let the dough tell its own story, and when you share the slices with your loved ones, it’ll spark memories that last a lifetime. If this dish brings back a memory, pass it on. Someone you love might need it today. Dive deeper into our site for more delightful recipes like Classic New York Style Cheesecake.
🟨 YOU MAY ALSO LIKE
You may also love these:
Sourdough Bread
Ingredients
Method
- In a large mixing bowl, combine the sourdough starter, warm water, and olive oil. Stir until well incorporated.
- Add the bread flour and sprinkle salt over the top. Stir until the dough is mostly combined and shaggy.
- Cover the bowl with plastic wrap and let it sit for one hour (autolyse period).
- After one hour, form the dough into a ball and gently stretch and fold it four times.
- Allow the dough to rise until it has increased in size by about 80% (4-6 hours).
- Lightly grease a 9×5 loaf pan and turn the dough out onto a floured surface.
- Shape the dough into a rectangle, roll it into a loaf shape, and transfer it to the prepared pan.
- Cover with plastic wrap and refrigerate overnight.
- Preheat the oven to 450°F.
- Score the top of the dough with a sharp knife.
- Bake covered for 30 minutes, then uncovered for another 20-23 minutes until golden brown.
- Allow the bread to cool in the pan for 15 minutes, then finish cooling on a rack for 1-2 hours before slicing.