
Ever found yourself dreaming of baking fresh bread but felt overwhelmed by all the kneading, timing, and tools? You’re not alone. Many home cooks feel intimidated by the idea of bread-making but this no-knead peasant bread breaks all the rules. It’s the one recipe that’s followed my family through generations, and it might just become the only one you ever need. Golden and crusty on the outside, soft and buttery inside, it’s the kind of bread that makes a salad sing and turns an ordinary soup into a feast. No preheated Dutch oven, no mixer, no fuss just old-fashioned magic.
Why You’ll Love This Recipe
Comfort Without Complication: My Family’s Bread Legacy
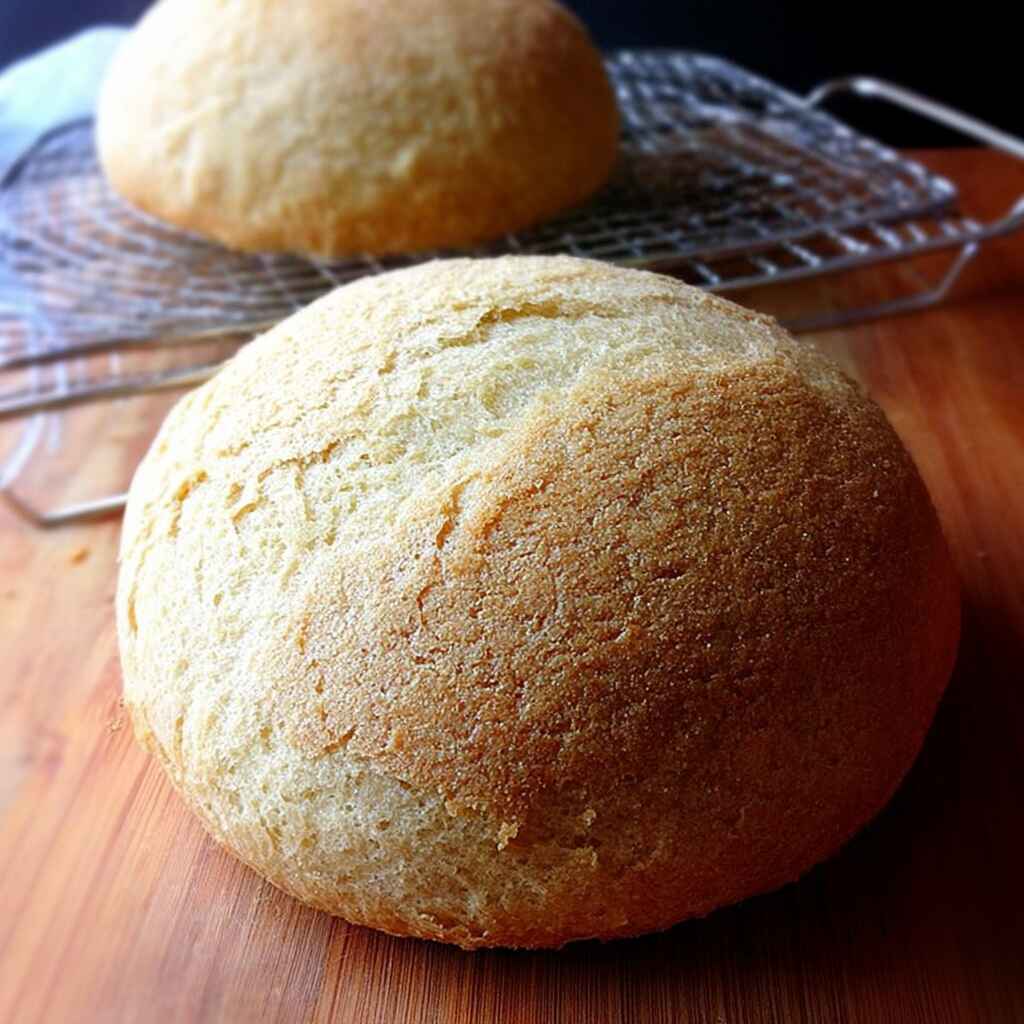
This no-knead peasant bread is the one recipe I’ve seen bring the most joy and surprise to guests. It’s the one that turns first-time bakers into believers. I still remember the first time I made it solo nervous, uncertain and then watching in awe as two golden domes rose in my Pyrex bowls, buttery and proud. That was decades ago, and I’ve never looked back.
The Simple Solution to Stunning Homemade Bread
If you’ve ever felt like homemade bread was out of reach, this recipe is your redemption. With just a few pantry ingredients and zero kneading, you’ll produce a loaf with a crisp, buttery crust and a moist, spongy crumb. It’s no-knead peasant bread at its finest rustic, forgiving, and endlessly rewarding.
You don’t need special flours or fancy tools. Just a bowl, a fork, and two buttered Pyrex bowls. Forget preheating cast iron. Forget steam ovens. This is bread that loves you back because anyone can make it, and everyone devours it.
And the best part? It’s versatile enough for grilled cheese, elegant enough for dinner parties, and hearty enough to stand alone with a smear of butter.
Ingredients Breakdown & Prep Tips
Ingredient List with Suggestions
Even the most impressive breads can be made from humble, familiar ingredients. This no-knead peasant bread proves that simplicity is powerful and pantry staples can transform into something magical.
Here’s a breakdown of what each ingredient brings to the dough:
| Ingredient | Notes |
|---|---|
| Unbleached All-Purpose or Bread Flour | The backbone of the bread all-purpose yields tender results, while bread flour gives it more chew. |
| Kosher Salt | Enhances flavor and balances the yeast; don’t skip it. |
| Lukewarm Water | Activates the yeast and binds the dough; make sure it’s not hot, just warm to the touch. |
| Sugar | Feeds the yeast and helps with browning. |
| Instant Yeast (e.g. SAF Instant Yeast) | No proofing required just mix it right in with the flour. |
| Butter (for greasing) | Creates that golden, buttery crust and prevents sticking in the bowls. |
Swap Tip: Want a slightly heartier bite? Use half whole wheat flour, but start with the classic all-purpose version to get the feel of the dough first.
Prep Method with Sensory Cues
This isn’t the kind of bread recipe that demands precision kneading or special equipment. Just a bowl, a fork, and a little bit of warmth and you’re on your way to the best bread of your life.
Here’s what the process feels like:
- Mix the dough. It should be shaggy and sticky don’t worry if it looks messy!
- First rise. After 1.5–2 hours, the dough should look pillowy and doubled in size.
- Fork fold + divide. Use two forks to punch it down and split it in half — it’ll feel soft and elastic, like doughy taffy.
- Transfer to buttered bowls. A bit messy, yes, but trust the process.
- Second rise. The dough should puff up just to the rim of the bowl — not overflowing.
- Bake. A golden crust will form in the oven, and the kitchen will smell like magic.
Pro tip: Grease your bowls generously butter not only helps release the bread, but gives it that rich flavor and iconic crust.
| Nutrient | Per Serving |
|---|---|
| Protein | 7g |
| Carbs | 12g |
| Fat | 6g |
Avoid These Mistakes
Common Mistakes & Fixes
Even with an easy recipe like this, a few missteps can throw off your loaf. Here’s how to sidestep the most common peasant bread pitfalls:
- Using too much flour: This is the #1 issue. The dough should be sticky, not stiff. Use a digital scale for accuracy and avoid packing flour into measuring cups.
- Letting the second rise go too long: The second rise should only take 20–30 minutes. If over-proofed, the bread can collapse in the oven.
- Skipping the buttered bowl step: Without that rich layer of butter, your bread might stick and miss out on that golden crust.
- Cold kitchen = sad rise: If your kitchen is chilly, give your dough a cozy corner — like atop a warm (but off) oven.
Pro Tips to Get It Right
These smart adjustments will take your bread from good to unforgettable:
- Use Pyrex bowls or muffin tins to help the wet dough hold its shape the glass helps the crust crisp beautifully.
- Add seeds to the buttered bowl before adding dough for extra flavor and texture sesame, everything seasoning, or dukkah are game-changers.
- Slice and freeze half the loaf if you’re not eating it within two days — it reheats like fresh!
- Looking for a savory twist? You’ll love this French Bread Pizza.
Try this easy breakfast treat next: Cinnamon Roll Coffee Cake – Easy, Cozy, and Perfect with Coffee.
Serving, Storage & Creative Variations
Best Ways to Serve It
This no-knead peasant bread is endlessly versatile. Here’s how to enjoy it to the fullest:
- Fresh from the oven with soft butter or olive oil and flaky salt the simplest, most rewarding bite.
- As the centerpiece of a charcuterie board, with cheese, olives, and fruit.
- To elevate a weeknight dinner pair it with a hearty soup or herby salad.
- Toast it up the next morning for avocado toast, jam, or eggs.
It’s also perfect for grilled cheese sandwiches the crust crisps beautifully and the inside stays tender.
Storage + Seasonal or Dietary Variations
This bread keeps well and adapts beautifully to your dietary needs or flavor cravings:
- Room Temp: Store in a ziplock bag for up to 4 days toast to revive.
- Freeze: Slice and freeze immediately after cooling. Pop into toaster or oven directly from frozen.
- Whole Wheat Option: Replace up to 50% of the flour with whole wheat — just reduce the water slightly and expect a more rustic crumb.
- Seed-Coated Crust: Butter your bowls and press in seeds before adding the dough. Adds a burst of flavor and crunch.
Try another nutritious twist with this Almond Flour Banana Bread.
Bake a batch of these soft Cinnamon Apple Muffins – Moist, Warm & Bakery Style.
FAQ Section
How do I know when the dough is ready to bake?
Once the dough has risen to the rim of the buttered bowl after the second rise (about 20–30 minutes), it’s ready. The top should look puffed and rounded.
Can I use active dry yeast instead of instant yeast?
Yes! Just bloom it first in the warm water with sugar until it looks foamy, about 10 minutes, then proceed with the recipe as normal.
Can I double the recipe?
Absolutely. Just make sure you have enough oven-safe bowls or pans. Or bake a large loaf in a Dutch oven or 9×13 Pyrex dish.
What’s the best way to reheat this bread?
For slices, use the toaster. For half or whole loaves, bake at 350ºF for 15–20 minutes. It will taste like it was just made.
Conclusion
This no-knead peasant bread is more than just a recipe it’s a tradition worth passing down. Whether you’re new to bread-making or just want a reliable, golden-crusted loaf, this one delivers every time.
If this dish brings back a memory, pass it on. Someone you love might need it today.
No-Knead Peasant Bread That Anyone Can Bake
Ingredients
Method
- Whisk together flour, salt, sugar, and yeast.
- Add lukewarm water and stir to combine into a sticky dough.
- Cover and let rise 1.5 to 2 hours, until doubled in size.
- Use two forks to punch down dough and divide in half.
- Transfer each half into well-buttered Pyrex bowls.
- Let rise again for 20–30 minutes, until dough crowns the bowl rim.
- Bake at 425ºF for 15 minutes, then at 375ºF for 15–17 minutes more.
- Turn out and cool on wire rack before slicing.