
As the air turns crisp and the days grow shorter, there’s nothing quite like the comforting aroma of freshly baked bread wafting through the home. Yet, we’ve all been there — the thought of waiting for yeast to do its magic can feel daunting. Whether you’re a busy mom, a college student, or someone simply pressed for time, this Homemade No Yeast Bread (Soda Bread) recipe is here to save the day. With simple, accessible ingredients and a method that yields warm, golden bread in just about 45 minutes, you won’t want to miss out on this delightful treat. Let’s gather in the kitchen together, where memories are made, and deliciousness is from the heart!
Why You’ll Love This Homemade No Yeast Bread (Soda Bread) Recipe
A Busy Life’s Blessing
Sometimes life feels overwhelmingly busy, with a never-ending to-do list that seems to grow by the minute. Finding time to bake bread might seem impossible, but imagine the joy of serving a warm loaf of Homemade No Yeast Bread (Soda Bread) to your family without the hours of waiting associated with traditional bread. The soft, chewy texture and hint of sweetness from honey blend perfectly, reminding you that simple pleasures can indeed bring profound happiness.
This Dish Solves That
The beauty of this Homemade No Yeast Bread (Soda Bread) is its simplicity. It effortlessly transforms ordinary moments into cherished memories, inviting the family into the kitchen to share stories, laughter, and joy. Shortly after mixing ingredients, the oven springs to life, filling your home with a fragrance that wraps around you like a warm embrace. Your loved ones will flock to you, their eyes gleaming with anticipation. And when that golden-brown loaf emerges from the oven, you’ll witness a scene of pure delight — the kind that reminds us of home.
Ingredients Breakdown & Prep Tips
Ingredient List with Suggestions
Here’s what you’ll need to create this delightful bread:
| Ingredient | Notes / Substitutions |
|---|---|
| 4 and 1/4 cups (531g) all-purpose flour (spooned & leveled) | Plus more for hands and surface. |
| 1 and 1/2 teaspoons salt | |
| 1 and 1/2 teaspoons baking soda | |
| 4 Tablespoons (1/4 cup; 60g) unsalted butter, melted | |
| 2 Tablespoons honey (43g) or granulated sugar (25g) | You can use either, but honey adds a deeper flavor. |
| 1 and 3/4 cups (420ml) buttermilk | Plus 1 Tablespoon for brushing the dough. |
| Optional: 1 Tablespoon whole oats | For topping, add a sprinkle of coarse sea salt or flaky sea salt for garnish. |
Prep Method with Sensory Cues
Begin by preheating your oven to 400°F (204°C) — feel that warmth? Prepare your baking pan: you have options! Line a baking sheet with parchment paper, or perhaps a well-seated cast iron skillet or a greased cake pan, whatever calls to you. The surface will soon cradle your masterpiece.
In a large bowl, whisk together the flour, salt, and baking soda until they dance together in harmony, their powdery softness lifting into the air. Then, in another bowl, whisk the melted butter with the honey — the golden liquid streams down like sunshine. Combine this mixture with your dry ingredients, tossing together as the sweet aroma fills the air; you can almost taste it!
Now comes the magic ingredient: buttermilk. In two or three additions, pour this silky liquid into the bowl, stirring gently after each pour until the dough shifts from a shaggy mass into a cohesive, slightly moist ball. If you chose honey, little specks of sweetness will appear, promising rich flavor throughout the bread.
With floured hands, pour your shaggy dough onto a lightly floured surface, forming it into a circle about 2 inches tall. Transfer this dough to your prepared pan, brushing it lovingly with the leftover buttermilk. For the finishing touch, score a deep “X” on the top of the dough with a sharp knife—this is a crucial step to allow your bread to bake evenly.
As the loaf bakes in the oven’s warm embrace for about 45 minutes, let the tantalizing smell envelop you. The golden crust will shimmer, calling you to it. Cover it with aluminum foil halfway through to ensure the crust doesn’t over-brown before the middle is ready.
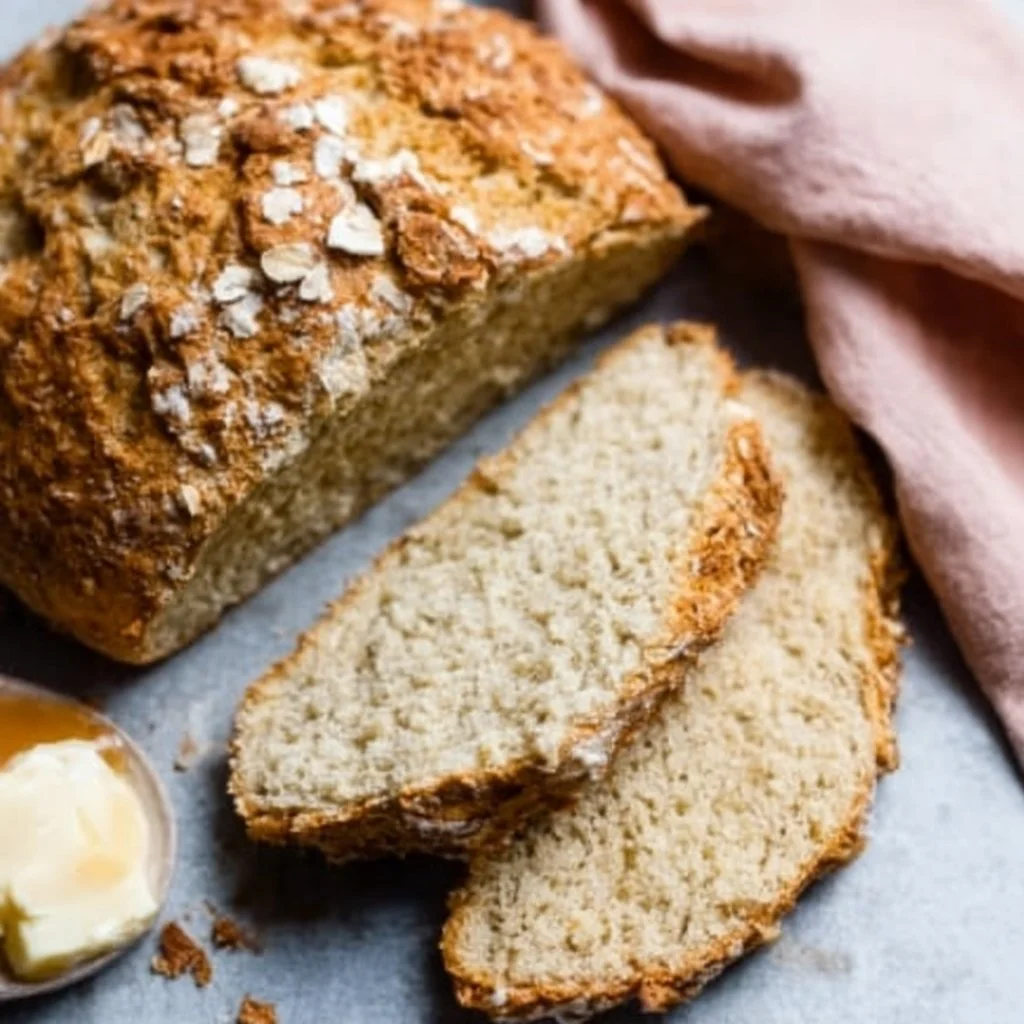
Once the timer rings out, allow the bread to cool for 5 minutes. Go ahead and take a peek; it’s golden brown glory awaits! But trust me, if you can stand to wait just a bit longer — 30 minutes is ideal for the best texture and flavor. Slice into this delightful creation, perfect for spreading with honey butter or perhaps slathered in your favorite jam.
You can savor every moment, knowing that this Homemade No Yeast Bread (Soda Bread) was made with love.
Avoid These Mistakes
Common Mistakes & Fixes
Dough Too Sticky: If your dough seems to want to cling to everything, don’t fret! Simply add a bit more flour until you achieve a workable consistency.
Not Scoring the Loaf: Remember that important “X” on the top? Skipping this step can lead to uneven baking. Don’t skip it; let it guide the steam.
Overmixing the Dough: This isn’t bread that needs kneading! Gently mix for the best texture. The goal is a tender crumb you’ll adore.
Skipping the Cooling Time: I know it’s tempting, but slicing the bread while it’s still warm can lead to a gummy texture. If you can, let it cool and enjoy the anticipation.
Pro Tips to Get It Right
Preheat Your Skillet: If using cast iron, a warm skillet can give the bottom of your bread a delightful crust.
Experiment with Flavors: Feel free to sprinkle herbs, cheese, or even spices like cinnamon into the dough for something extra special.
Be Patient: Good things take time! Just give the bread a chance to cool for the best slicing experience.
For more tasty bread recipes, check out Creamy Parmesan One Pot Chicken and Rice and Butternut Squash Soup Made Easy.
Serving, Storage & Creative Variations
Best Ways to Serve It
Your Homemade No Yeast Bread (Soda Bread) shines most beautifully next to heartwarming dinners like a classic stew or velvety soup. Imagine a cozy dinner with a warm bowl of Beef Stroganoff Recipe or Garlicky Feta Chicken Salad. The bread’s texture holds up beautifully for dipping, soaking up flavor in every bite.
Additionally, this bread is perfect for breakfast. Imagine toasting slices and spreading creamy peanut butter or a pat of butter to start your day with love.
Storage + Seasonal or Dietary Variations
Once your bread has graced your table, store it at room temperature for up to three days. If you find yourself with a loaf left, it can also last in the refrigerator for up to a week. For longer storage, feel free to freeze what’s left for future cozy meals!
Consider swapping the buttermilk for a dairy-free option or adding whole grains for a different flavor experience. For seasonal variations, fold in dried fruits or nuts, adapting this Homemade No Yeast Bread (Soda Bread) to suit your palate! Check out this delightful Cream of Mushroom Soup that Tastes Like Home that makes for a perfect pairing!
FAQ SECTION
What kind of flour is best for soda bread?
All-purpose flour works beautifully in this recipe, lending the bread a wonderful texture without needing yeast.
Can I make it gluten-free?
Yes! You can substitute with a gluten-free all-purpose flour blend, ensuring it has xanthan gum in the mix for the best results.
How do I tell when soda bread is done baking?
The bread should be a deep golden brown, and tapping the bottom of the loaf should sound hollow. A thermometer inserted should read at least 200°F.
Can I add herbs or cheese?
Absolutely! Feel free to personalize this recipe by folding in your favorite herbs, nuts, or cheese for a delicious twist!
Conclusion
In this whirlwind of life, making a Homemade No Yeast Bread (Soda Bread) is a heartfelt reminder of the warmth that our kitchens can provide. If this dish evokes memories of cozy family gatherings or special moments, pass it on. Someone you love might need it today. Relish more recipes that warm the heart like Mini Cakes for a Special Treat for ultimate comfort.
So roll up your sleeves, gather your ingredients, and let this be the start of something beautiful in your kitchen.
Homemade No Yeast Bread (Soda Bread)
Ingredients
Method
- Preheat your oven to 400°F (204°C).
- Prepare a baking sheet with parchment paper, a cast iron skillet, or a greased cake pan.
- In a large bowl, whisk together the flour, salt, and baking soda.
- In another bowl, whisk the melted butter with the honey.
- Combine this mixture with the dry ingredients, stirring well.
- Gradually add the buttermilk, mixing until a cohesive dough forms.
- On a lightly floured surface, shape the dough into a circle about 2 inches tall.
- Transfer the dough to the prepared pan, brushing the top with leftover buttermilk.
- Score a deep ‘X’ on the top of the dough with a sharp knife.
- Bake in the preheated oven for about 45 minutes.
- Cover with aluminum foil halfway through baking to prevent over-browning.
- Allow the bread to cool for 5 minutes before serving.
- For the best texture, wait an additional 30 minutes before slicing.