
There’s something truly magical about the smell of freshly baked bread wafting through the house, warm and inviting. As the dough rises and bakes, a comforting aroma fills the air, wrapping you in a blanket of nostalgia. But let’s be real—making an airy, perfect loaf of ciabatta bread can sometimes feel like a big, daunting task. An all-too-familiar scenario: we crave the great taste of homemade bread but worry about the time, effort, and potential mess involved in the process.
Fear not! With my Homemade Ciabatta Bread recipe, that carefree, delightful moment of bread-baking can be yours. Let’s bring the bakery home and fill our kitchens with the delightful aroma of ciabatta. Each bite is worth the wait, and trust me, the joy of pulling that first warm loaf out of the oven is an experience you won’t want to miss.
Why You’ll Love This Homemade Ciabatta Bread Recipe
A Common Baking Woe: Should I or Shouldn’t I?
We’ve all been there—staring at the yeast in the pantry, wondering if we have the time (and courage) to tackle making bread from scratch. The thought of sticky dough and potential failure often holds us back from what could be a blissful baking adventure. But what if I told you that Homemade Ciabatta Bread can be simpler than it seems? It does involve a little patience, but that’s just part of the joy of baking! The anticipation builds as the dough rises, waiting to transform into a glorious loaf that hugs your taste buds.
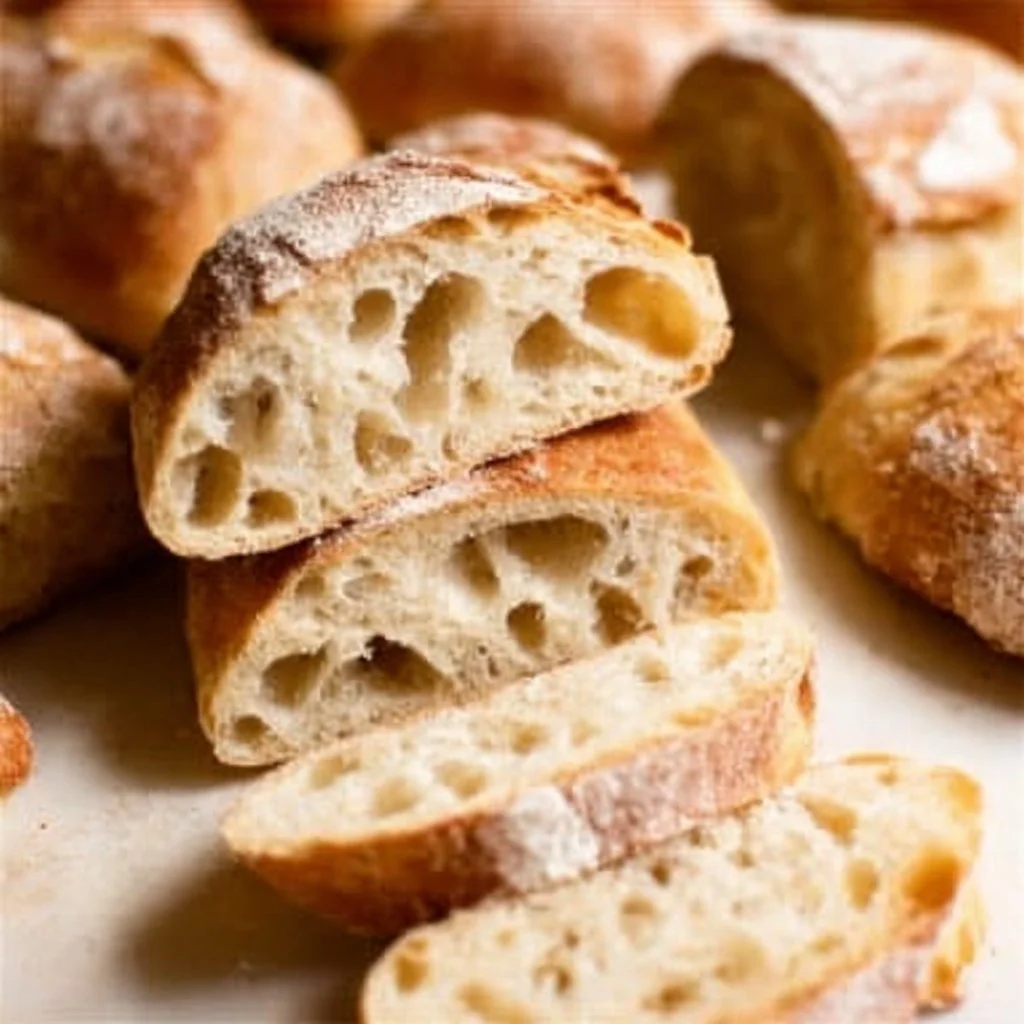
Oh, the Joy of Homemade Ciabatta Bread!
Imagine slathering soft butter on a warm slice of ciabatta, every bit as airy and light as a cloud. Homemade Ciabatta Bread isn’t just bread; it’s a creation that brings people together, makes meals special, and offers comfort with each bite. The crust is wonderfully crispy, while the interior is airy and chewy, making it perfect for sandwiches, pairing with your favorite soup, or simply enjoying with a dash of olive oil. It’s a heartwarming reminder that sometimes, the mess and the wait are exactly how the loveliest things in life come to be.
This delightful recipe is entirely possible in your kitchen! If you’ve ever made a big batch of Creamy Tortellini Soup to share with loved ones, you already have the spirit of sharing that makes homemade bread so special. And what pairs better with a cozy bowl of soup than soft, warm slices of ciabatta?
Ingredients Breakdown & Prep Tips
Ingredient List with Suggestions
Making Homemade Ciabatta Bread is about the simple ingredients. Here’s what you’ll need, and they likely reside in your pantry already:
| Ingredient | Notes |
|---|---|
| 1 cup (130g) bread flour | Spooned & leveled. |
| 1/8 teaspoon active-dry or instant yeast | |
| 1/2 cup (120g/ml) room-temperature water | About 70°F (21°C). |
| 1 teaspoon (3g) active-dry or instant yeast | |
| 1 cup (240g/ml) warm water | About 100–110°F (38°–43°C). |
| 2 and 1/2 cups (325g) bread flour | Spooned & leveled, plus more as needed. |
| 1 and 1/2 teaspoons (8g) table salt | |
| Olive oil | As needed for coating hands and spatula. |
Prep Method with Sensory Cues
Start this delightful journey by whisking together the bread flour and the 1/8 teaspoon of yeast in a large mixing bowl. As you mix, let the grainy texture of the flour soothe your senses. Add the 1/2 cup of room-temperature water and mix with a silicone spatula until it’s combined. Cover the bowl tightly with plastic wrap, and let it rest at room temperature to work its magic for 8 to 24 hours. This is your biga, the sponge that will boost the flavor and texture of your ciabatta.
When you’re ready to bring it all together, uncover the bowl and notice the gentle aroma of the matured biga. In a separate bowl or the bowl of your stand mixer, whisk together the remaining yeast and warm water. Let it sit for 5-10 minutes until it dissolves, and then mix in the biga, the remaining flour, and salt. At first, the dough may seem shaggy; continue mixing until it’s uniform. Don’t be afraid of that sticky texture—it’s a sign of a beautiful ciabatta!
Cover the bowl and let it rest for 30 minutes. This is where the dough begins to come to life. As you watch, it will slowly become a glorious, elastic mass full of promise.
Visualize a clock above the bowl. With olive oil-greased hands or a spatula, fold the dough over itself as if you’re wrapping it up in a loving hug. Do this at the 12 o’clock mark and gently stretch toward the 6 o’clock mark, turning the bowl each time. You’ll repeat this process four times, allowing the dough to rest for 30 minutes between each stretch-and-fold. After that, let it rest in the refrigerator for at least an hour or up to 24 hours to develop even more flavor! While waiting, you can prepare to indulge in a comforting Creamy Garlic Parmesan Chicken Pasta.
Now, let’s get our hands floured! Generously flour your work surface. Gently scrape the dough out onto the floured surface, shaping it into a rough rectangle about 10×7 inches. Whether you opt for 8 rolls or 2 loaves, this ciabatta bread will take on a rustic look that brings warmth and charm to any meal.
Pick up some parchment paper and arrange the pieces a couple of inches apart. Lightly cover the rolls with a clean kitchen towel, allowing them to come into their own. As they rise, preheat your oven to 450°F (232°C) and prepare for the magic.
When ready to bake, scatter ice cubes in a shallow baking pan—this introduces steam for a perfect crust. With excitement bubbling, place the rolls in the oven and watch as the magic unfolds for approximately 20–25 minutes. The delightful aroma fills your home, and you know success is near!
Once baked, cool them for 45 minutes before slicing. And trust me, those first bites will be worth every moment of patience.
Avoid These Mistakes
Don’t Let the Dough Deflate!
One common mistake is rushing the resting time. Allow your dough to rise properly; those moments are magical! If you cut the resting times short, you risk dense bread.
Pay Attention to Temperature
Ensure the water is the right temperature. Too hot, and you might kill the yeast; too cold, and it won’t activate properly. A warm embrace is all it needs!
Embrace the Mess
Don’t fear the sticky dough. It’s a sign that you’re on the right path toward that beautifully crusty ciabatta. Knead and work with it as it is—sticky is what you’re aiming for!
Pro Tips to Get It Right
- Patience is Key: Allowing for long rises gives your bread flavor and texture. Embrace the process!
- Feel Free to Experiment: Once you grasp it, try adding herbs or spices to enhance your ciabatta!
- Don’t give up! The more you make Homemade Ciabatta Bread, the more confident you’ll grow. Cooking should always bring joy, after all!
You might want to complement your ciabatta with a luscious Garlicky Feta Chicken Salad or a rich Creamy Parmesan One-Pot Chicken and Rice.
Serving, Storage & Creative Variations
Best Ways to Serve It
Homemade Ciabatta Bread is wonderfully versatile. Serve it at a cozy family dinner alongside a comforting bowl of Hamburger Potato Soup, or let it steal the show with a vibrant tomato salad. Its crusty exterior and soft interior are magnificent for making a panini, or simply enjoy it dipped in a rich balsamic vinegar or olive oil.
Storage + Seasonal or Dietary Variations
To store, loosely cover the bread at room temperature for up to 5 days or refrigerate for a week. Plus, I love how this recipe can adapt! You can try incorporating whole wheat flour or experimenting with different flours for unique flavors.
If you have a craving for something sweet, consider whipping up Mini Cakes for a Special Treat to go alongside your ciabatta.
FAQ Section
How long can I store Homemade Ciabatta Bread?
Homemade Ciabatta Bread can be stored loosely covered at room temperature for up to 5 days. Optionally, it can be kept in the refrigerator for about a week.
Can I freeze Homemade Ciabatta Bread?
Absolutely! Just wrap it tightly in plastic wrap and foil, placing it into the freezer. It can be frozen for up to 3 months; simply thaw it before enjoying!
Why is my ciabatta dough so sticky?
Don’t worry! A sticky dough is typical for ciabatta, ensuring that you achieve that characteristic airy texture. Just keep some flour handy for managing your hands and work surface.
What can I do with leftover ciabatta?
Use it for croutons, breadcrumbs, or toast it for a delicious breakfast. The options are endless!
Conclusion
Homemade Ciabatta Bread is more than a recipe; it’s an invitation to gather with loved ones, to connect through food, and to savor those beautiful moments in life. Each loaf carries with it a touch of warmth, nostalgia, and a chance to create cherished memories.
If this dish brings back a memory, pass it on. Someone you love might need it today. And as you embark on your baking journey, consider trying out a comforting Crockpot White Chicken Chili alongside your freshly baked bread!
Homemade Ciabatta Bread
Ingredients
Method
- In a large mixing bowl, whisk together the bread flour and the 1/8 teaspoon of yeast.
- Add the 1/2 cup of room-temperature water and mix with a silicone spatula until combined.
- Cover the bowl tightly with plastic wrap, and let it rest for 8 to 24 hours.
- In a separate bowl, whisk together the remaining 1 teaspoon of yeast and warm water and let it sit for 5-10 minutes until dissolved.
- Mix in the biga, remaining flour, and salt until uniform.
- Cover the bowl and let the dough rest for 30 minutes.
- Grease your hands or a spatula with olive oil and fold the dough over itself as if wrapping it up. Repeat this process four times resting for 30 minutes between each fold.
- Let the dough rest in the refrigerator for at least an hour or up to 24 hours.
- Flour your work surface and gently scrape the dough out onto it, shaping it into a rough rectangle about 10×7 inches.
- Shape into 8 rolls or 2 loaves and place on parchment paper with space between them. Cover loosely with a kitchen towel and let rise.
- Preheat the oven to 450°F (232°C). Scatter ice cubes in a shallow pan to introduce steam.
- Bake the rolls for 20–25 minutes.
- Allow to cool for 45 minutes before slicing.